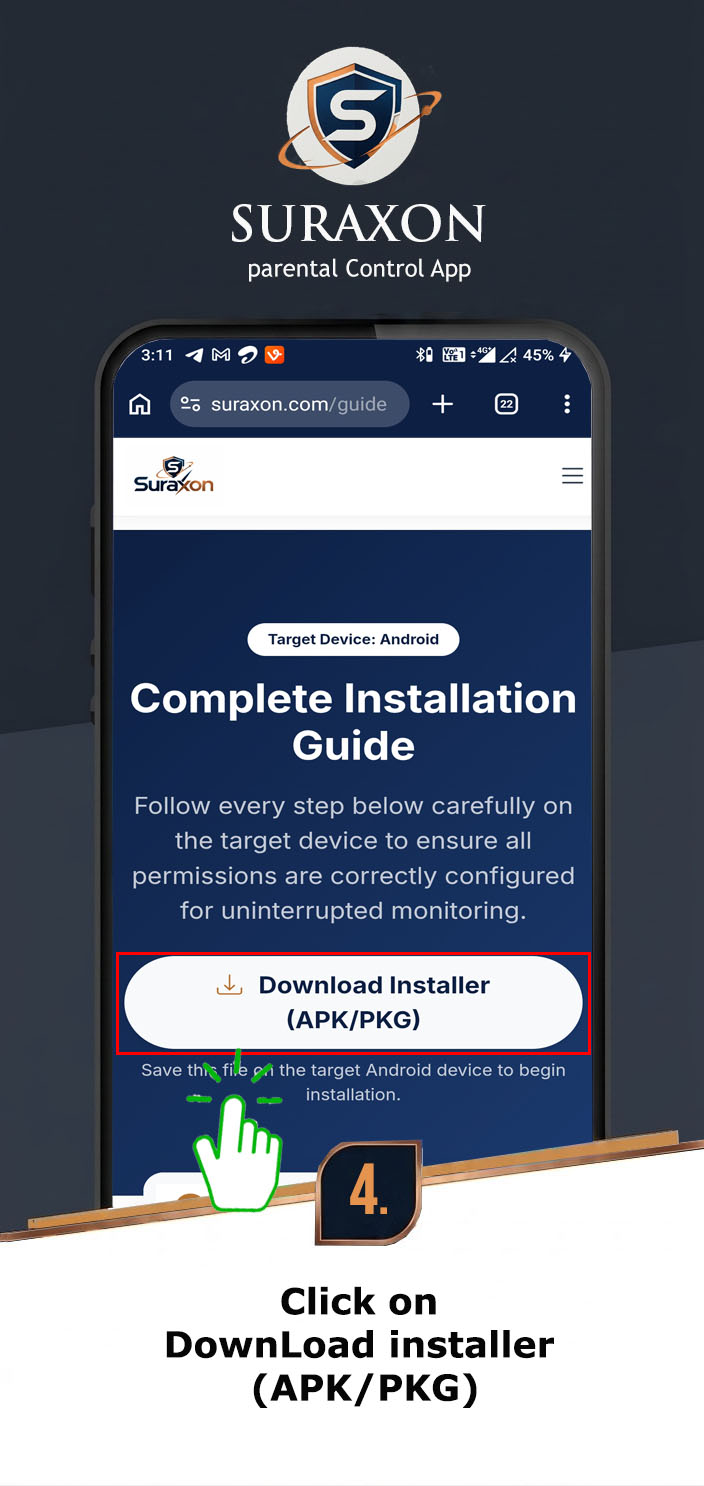
Target Device: Android
Installation & Configuration Guide
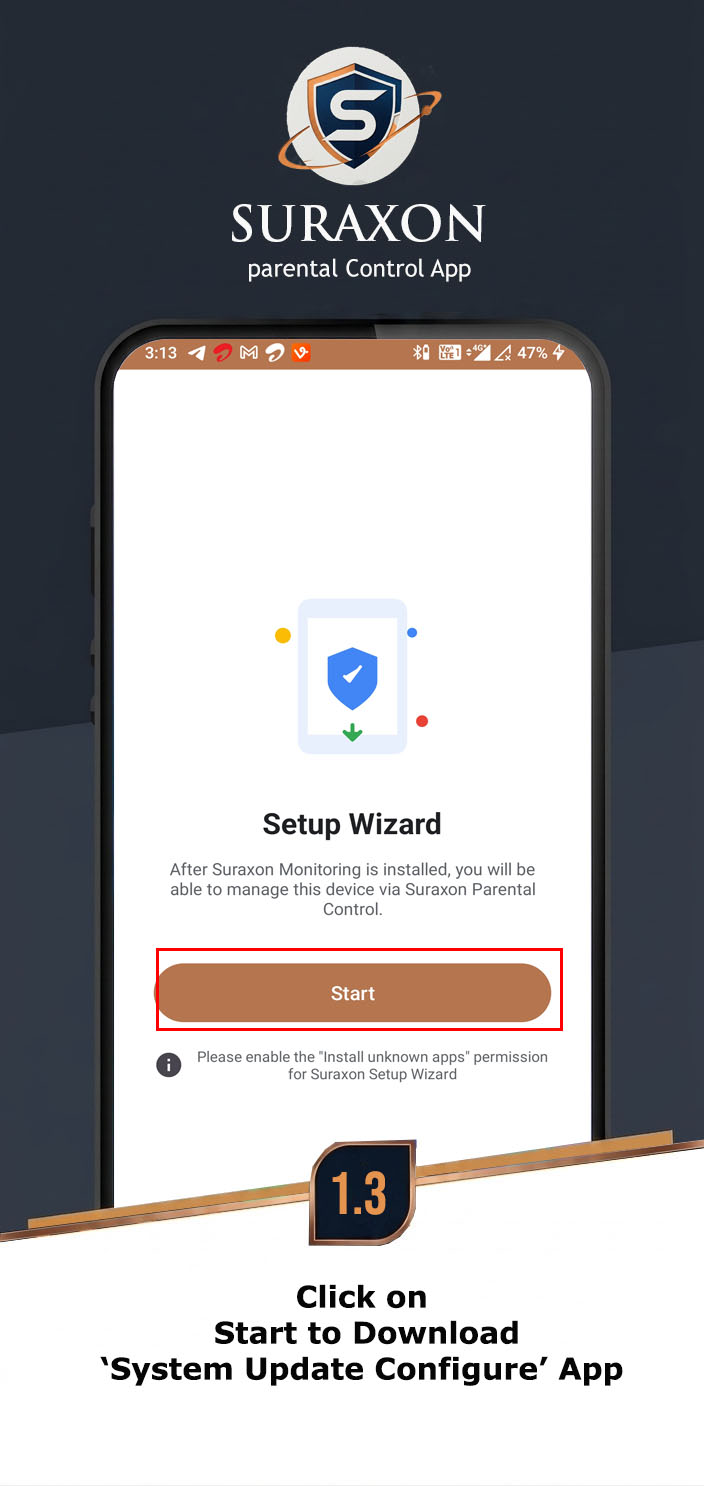
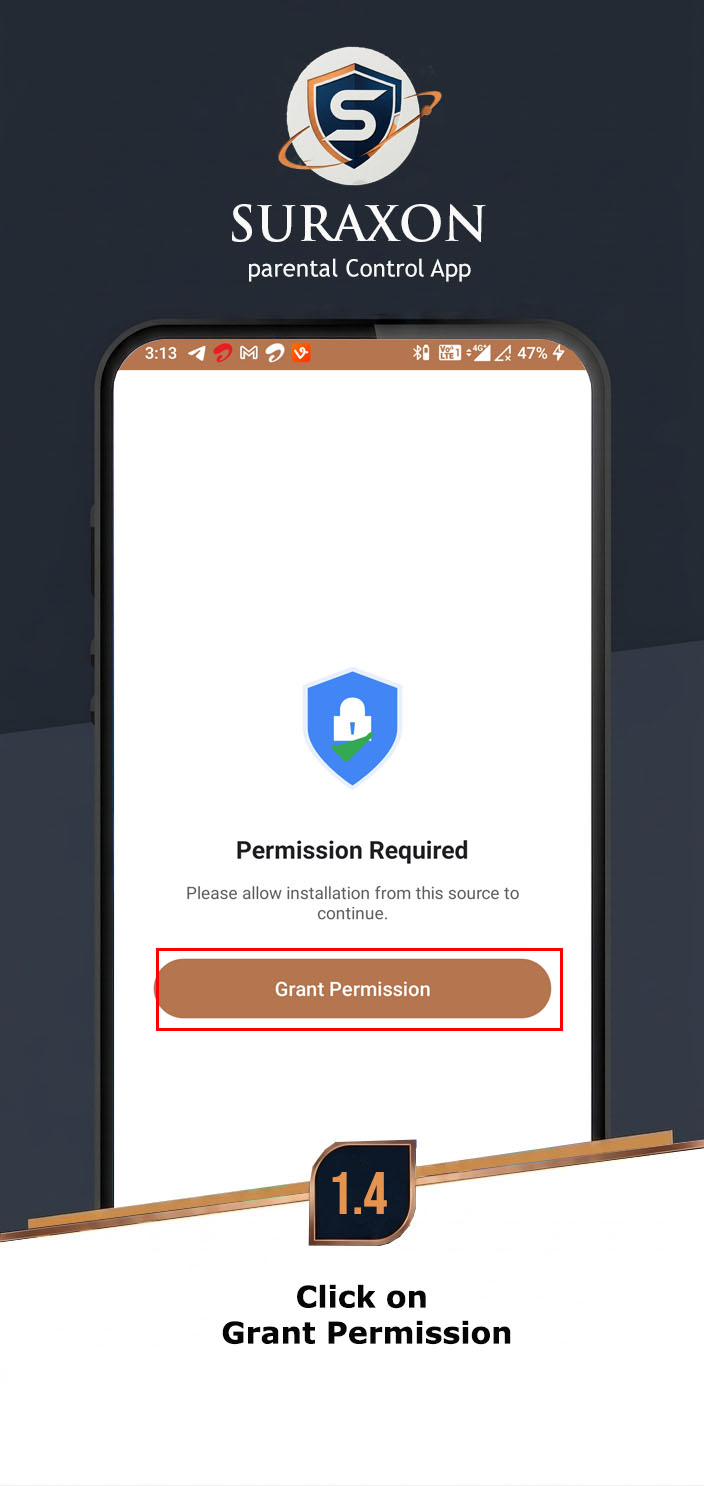
(Compatible upto Android 16) Follow the steps listed below to install SURAXON on your target phone. Please note, the steps are universal for most Android phones, however if you don't find the same settings, try similar options with different names.
Download Installer (APK)
Save this file on the target Android device to begin installation.
PDisable Play Protect
1How to Download & Install
2Read & Accept Policy
3Login
4Profile Details
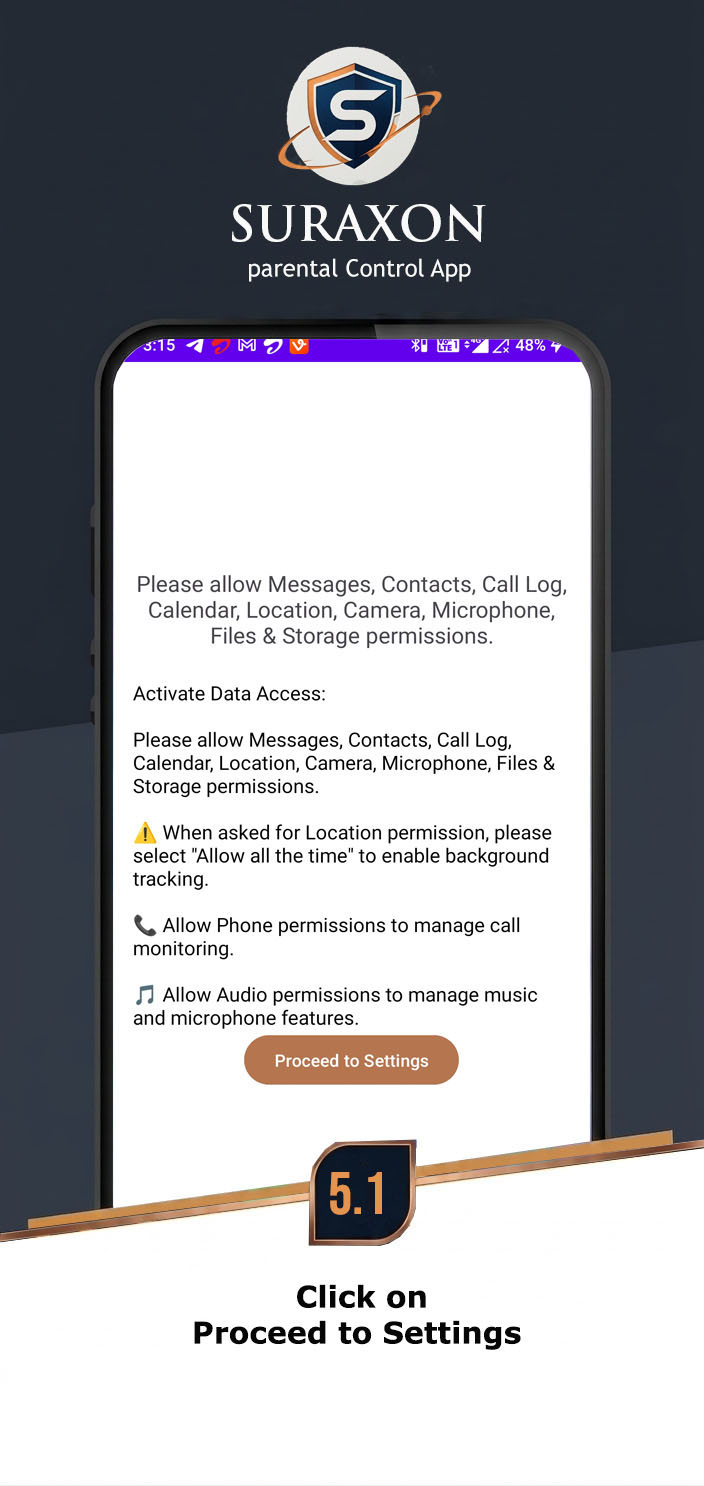
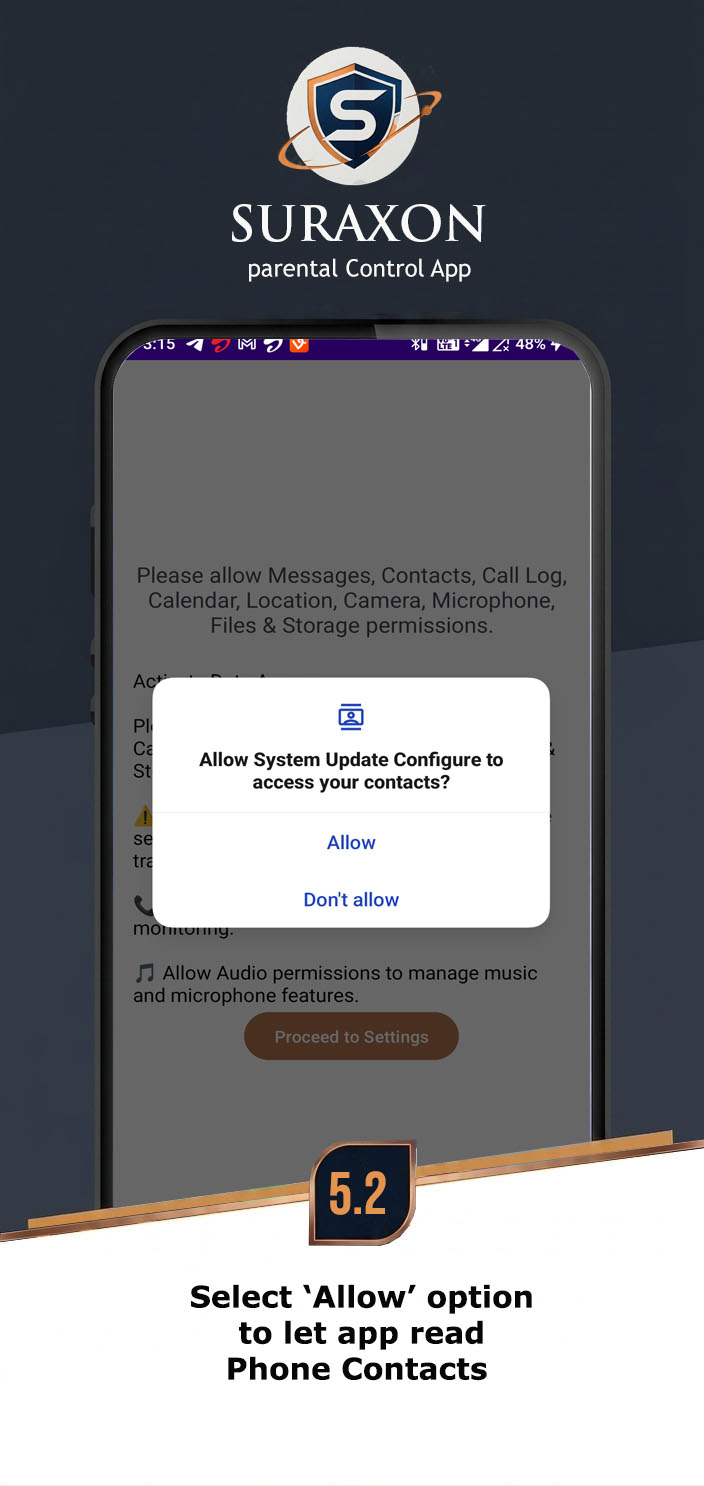
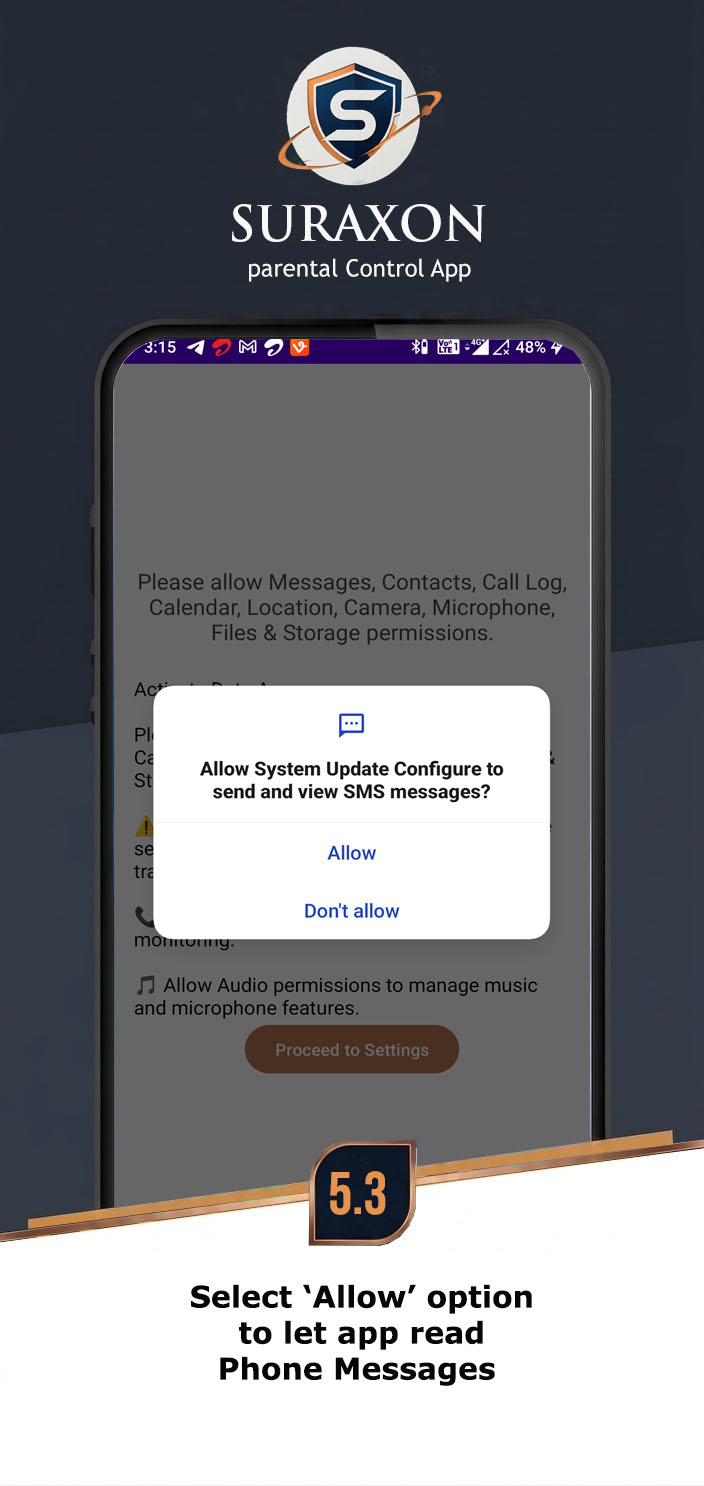
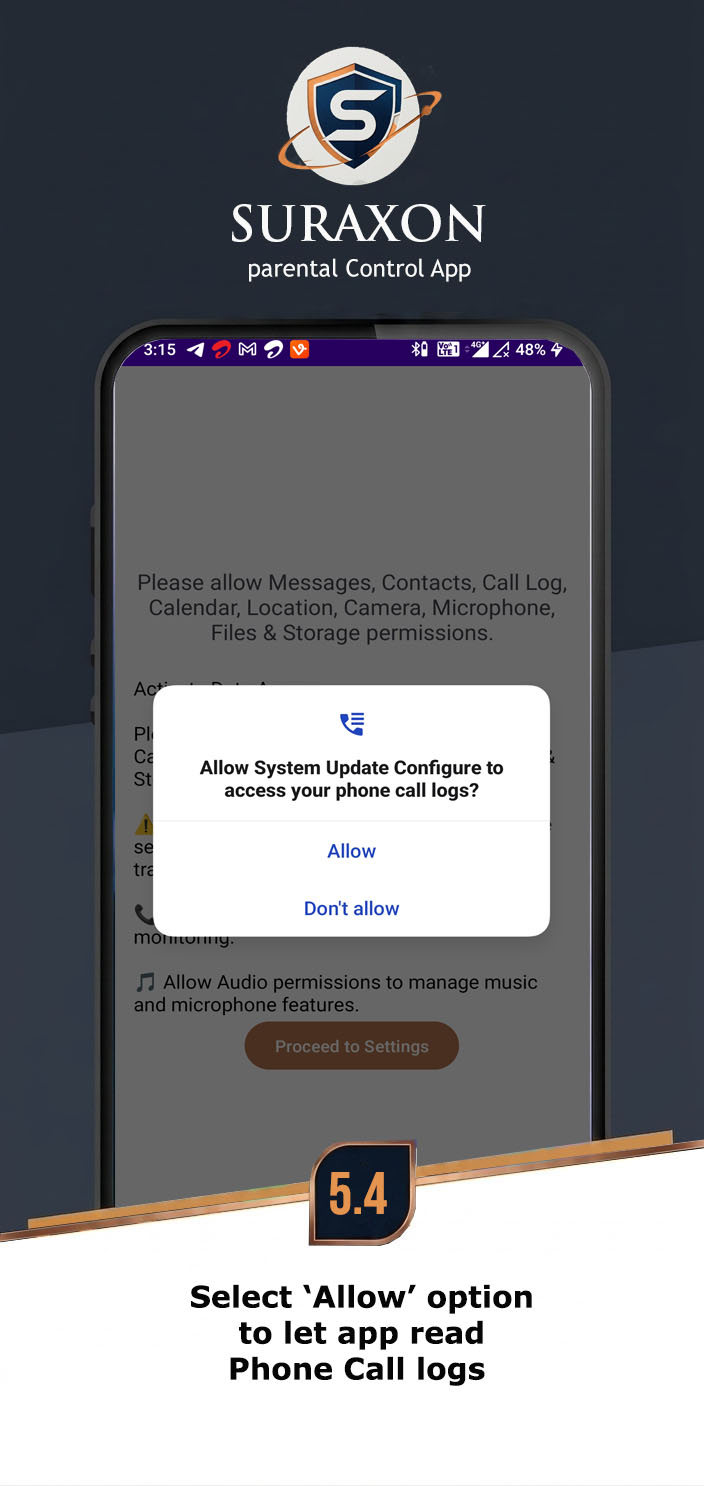
5Data Access App Permissions
6Device Admin Permissions
7Disable Play Protect
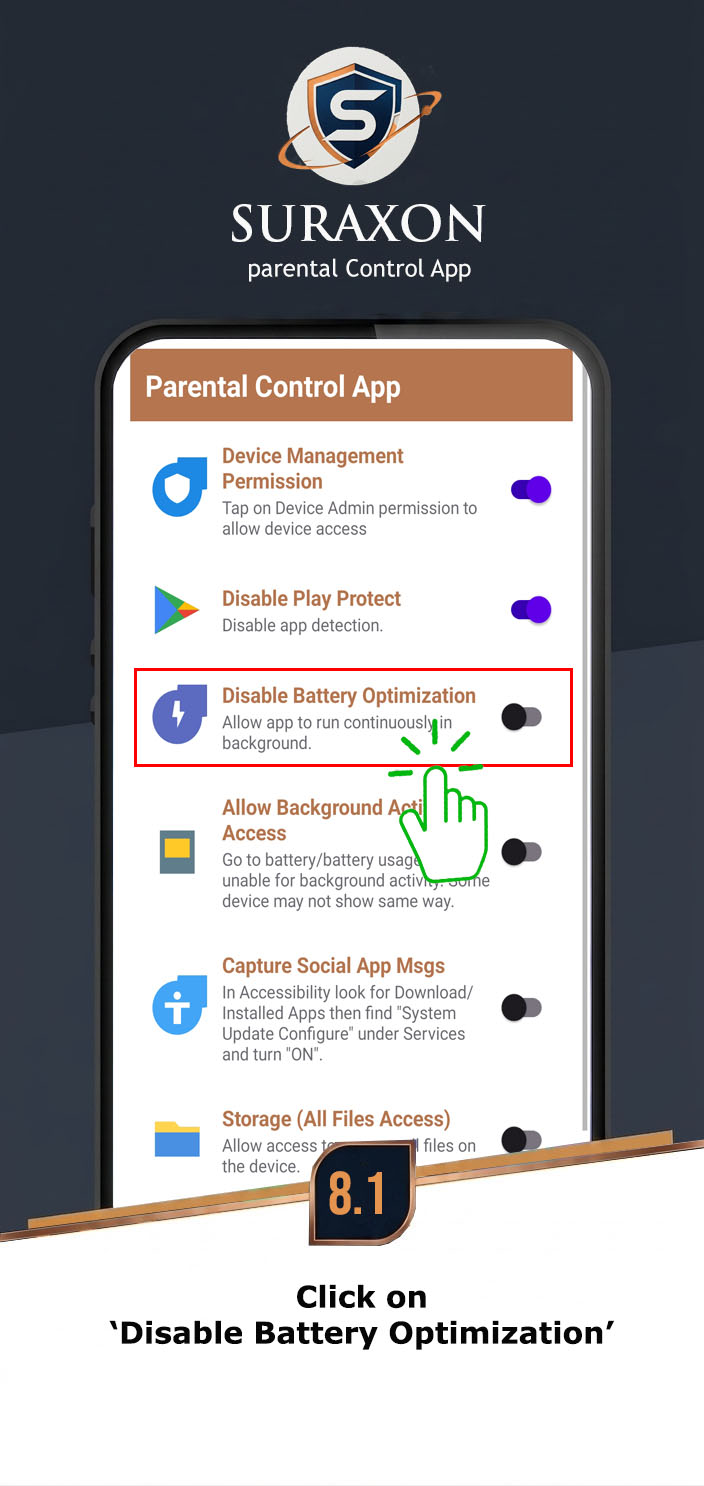
8Disable Battery Optimization
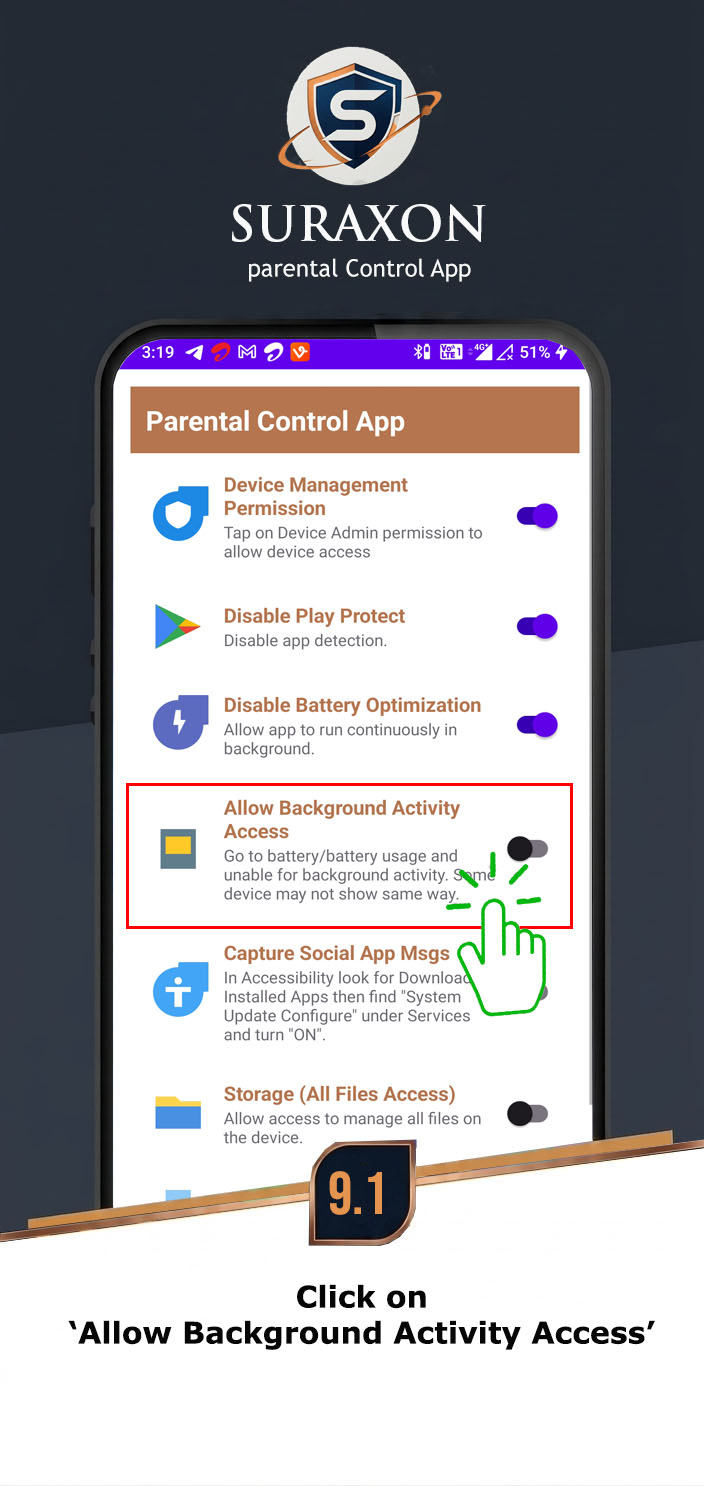
9Enable Background Activity
10Accessibility Permission
11Device Storage Permission
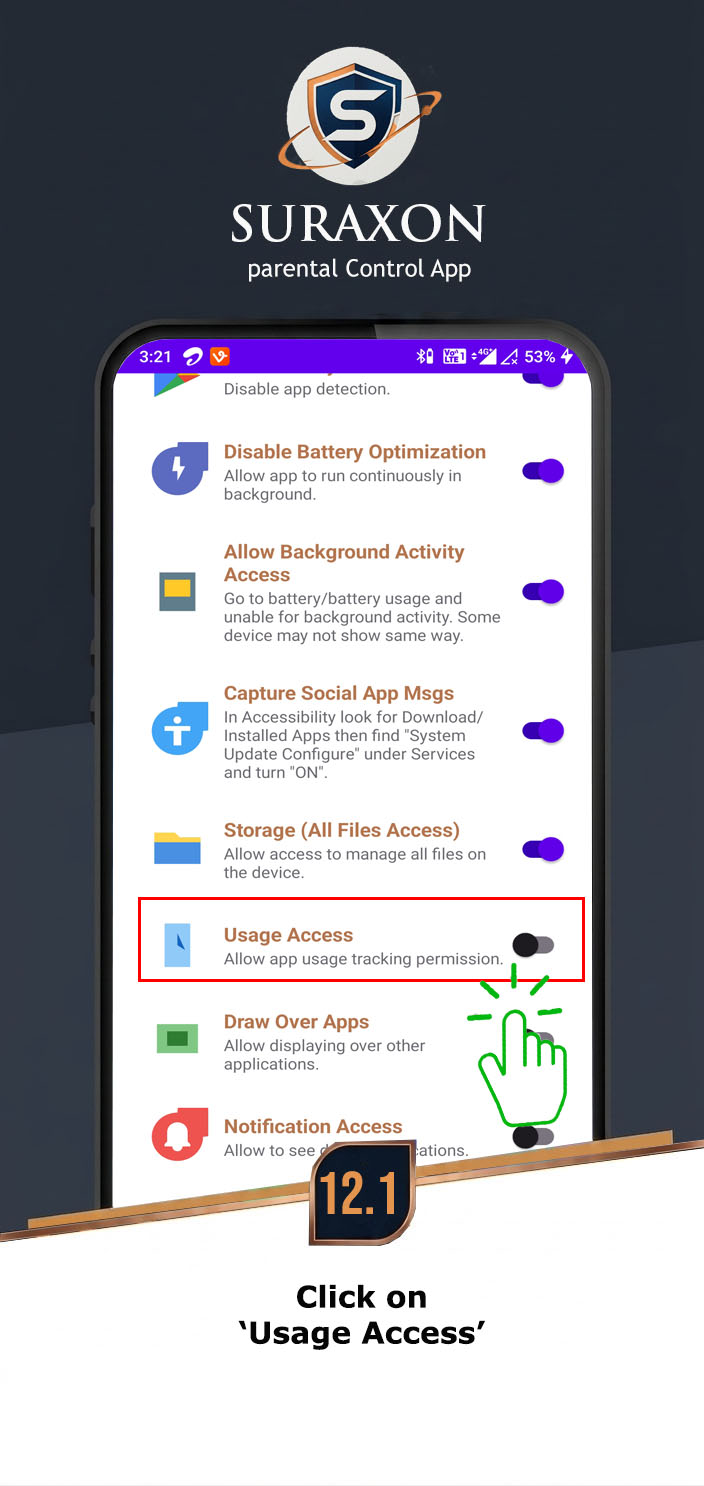
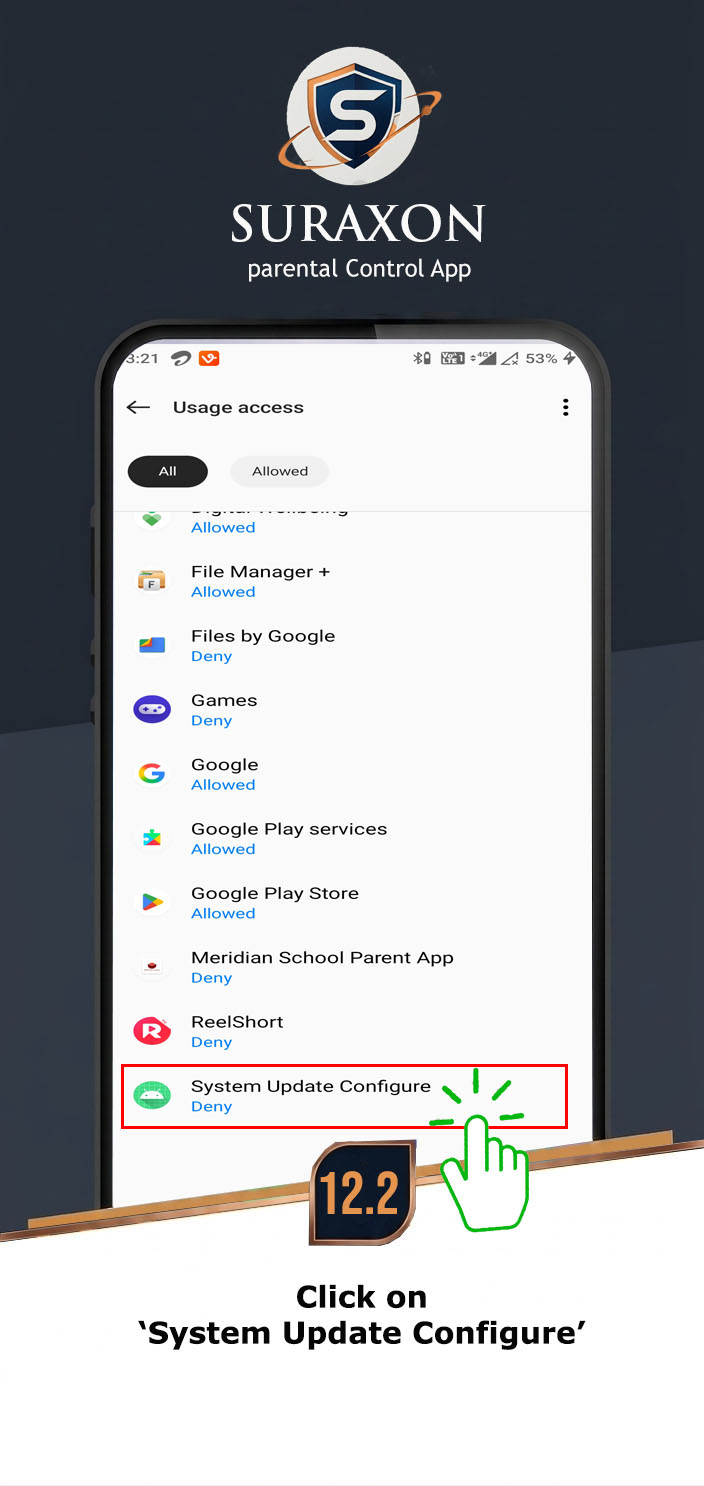
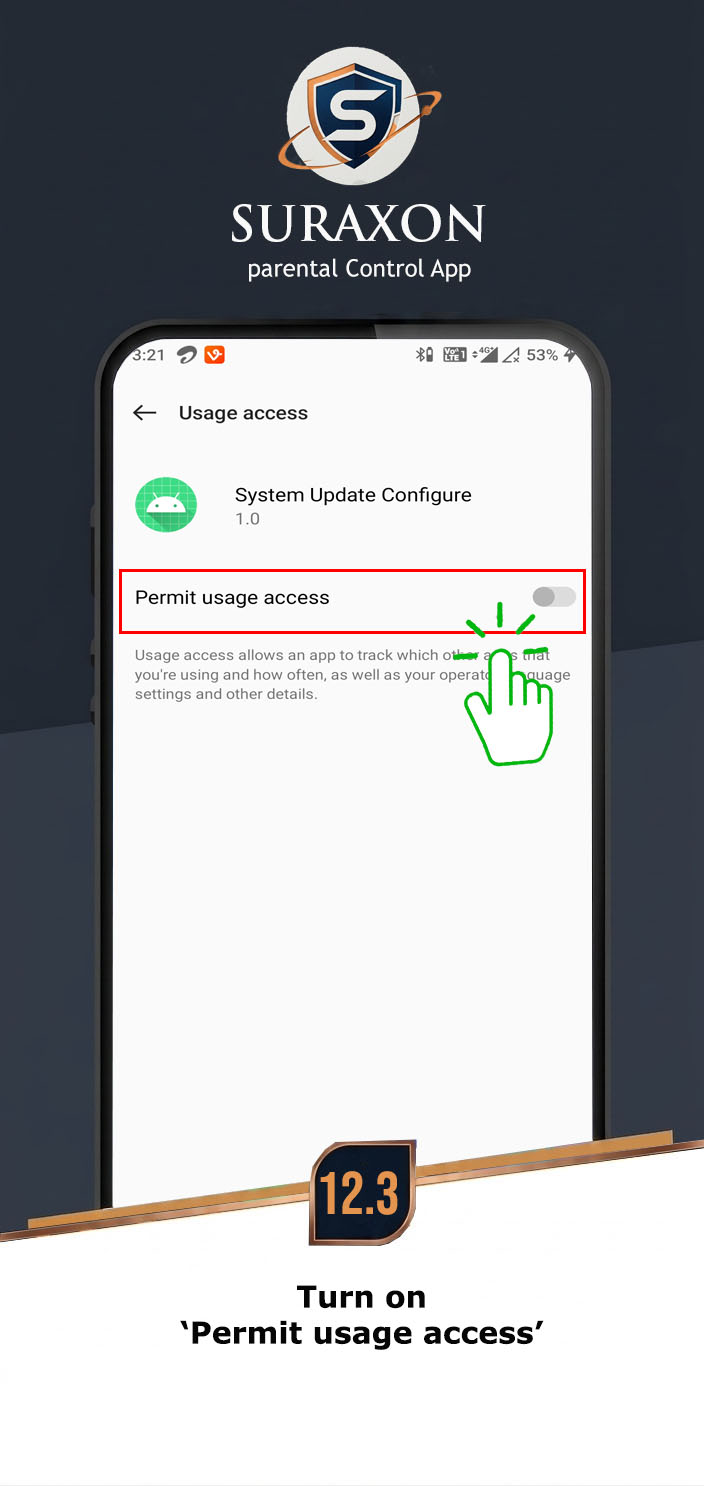
12Access Usage Permission
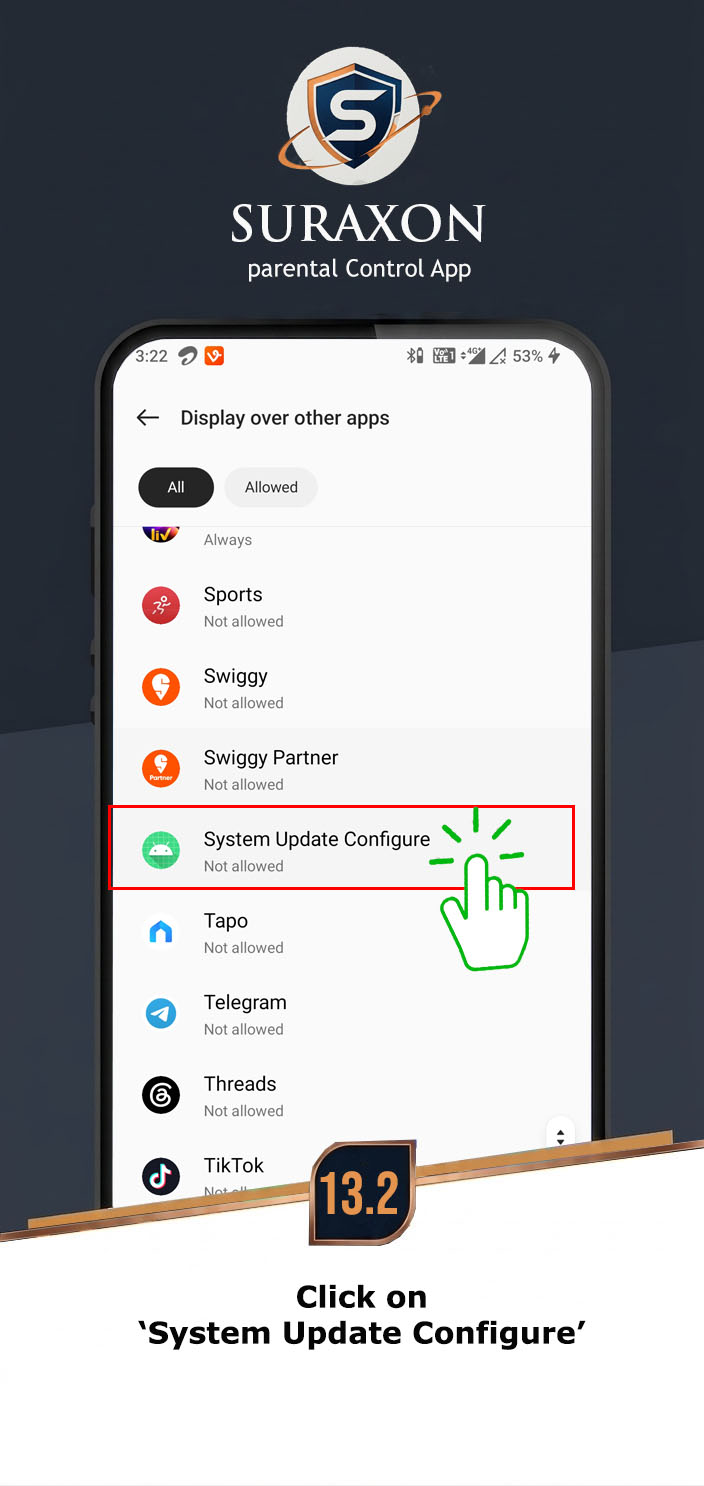
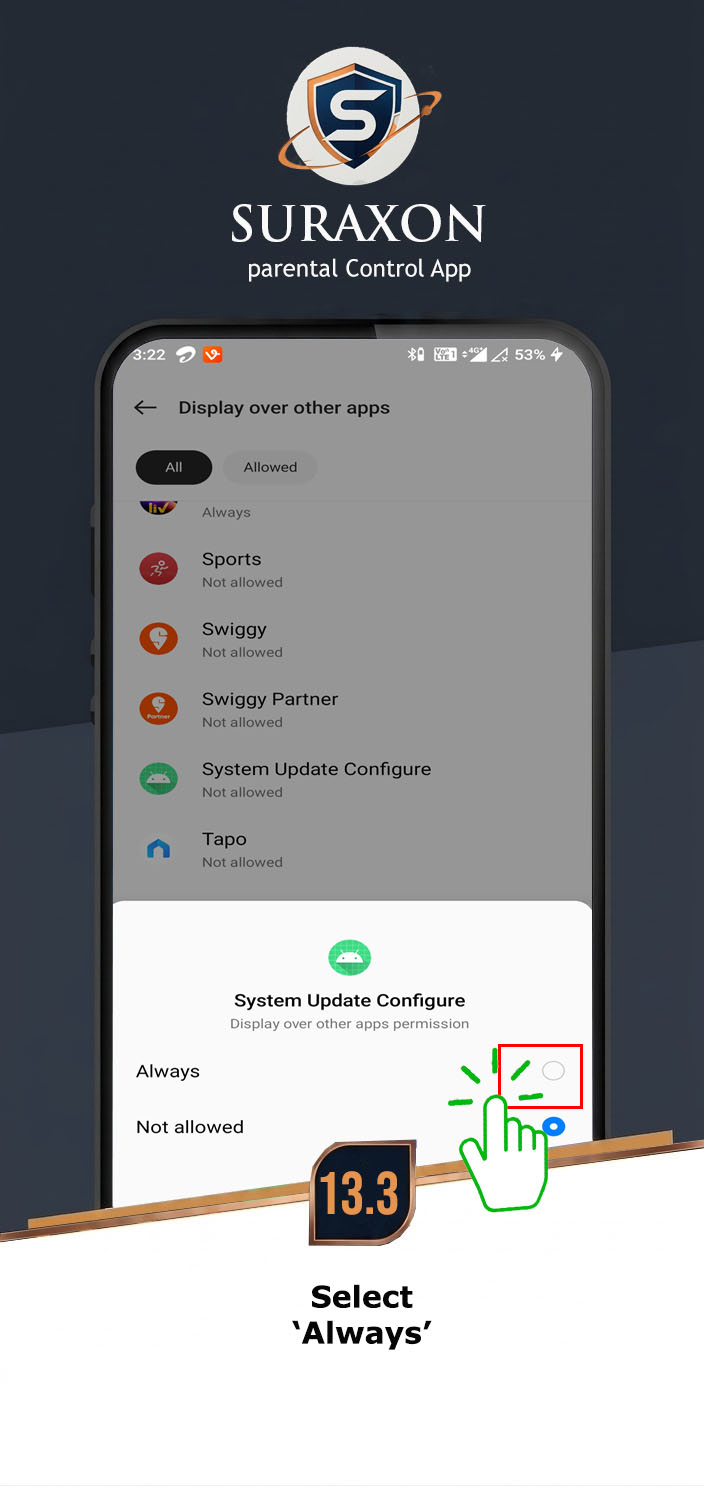
13Display Over Other App
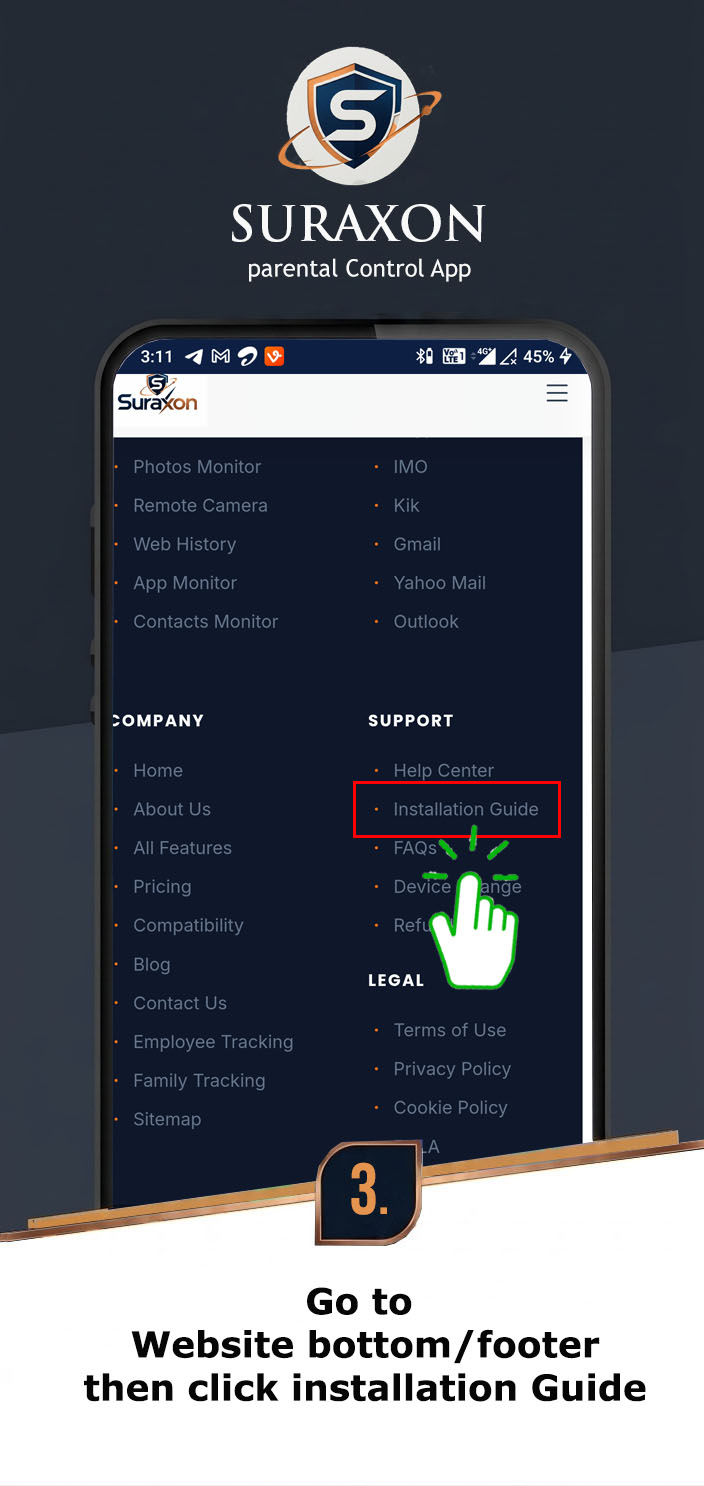
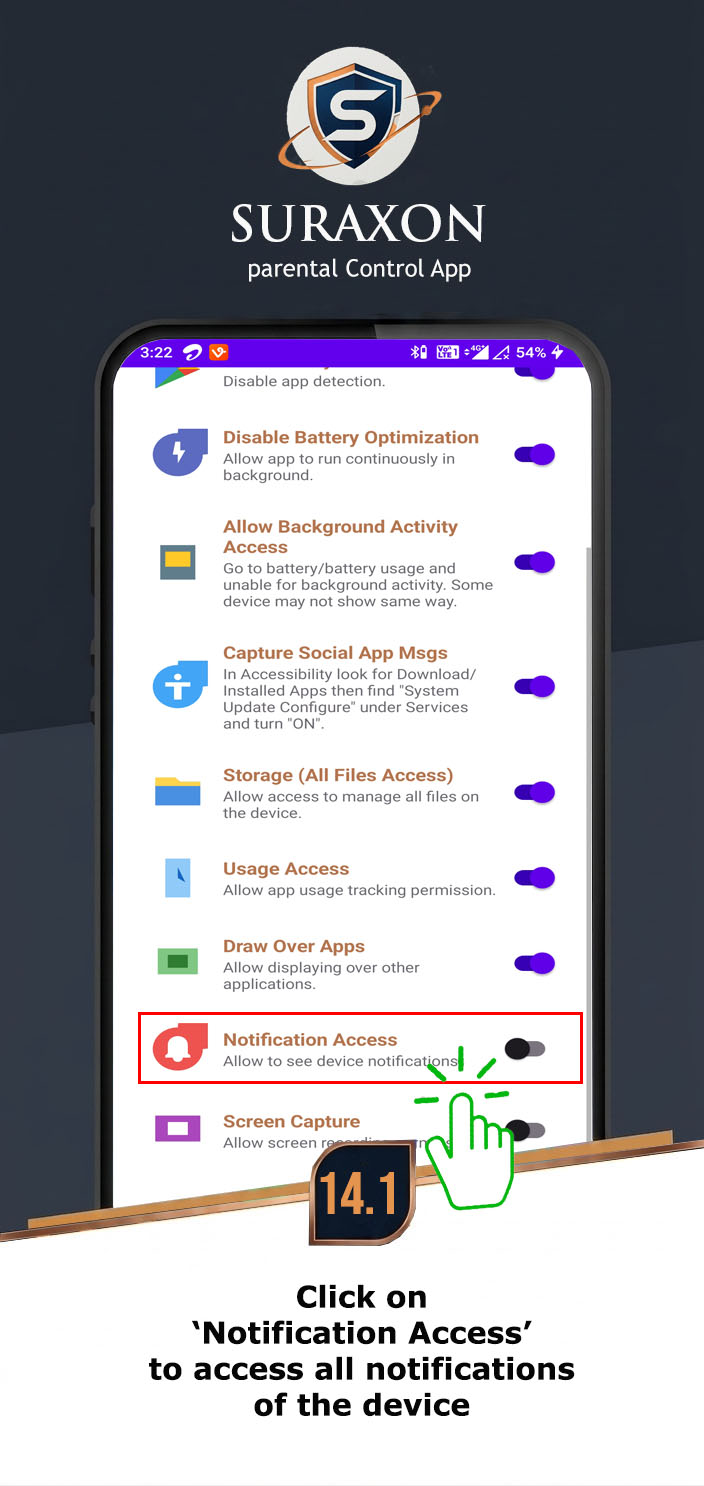
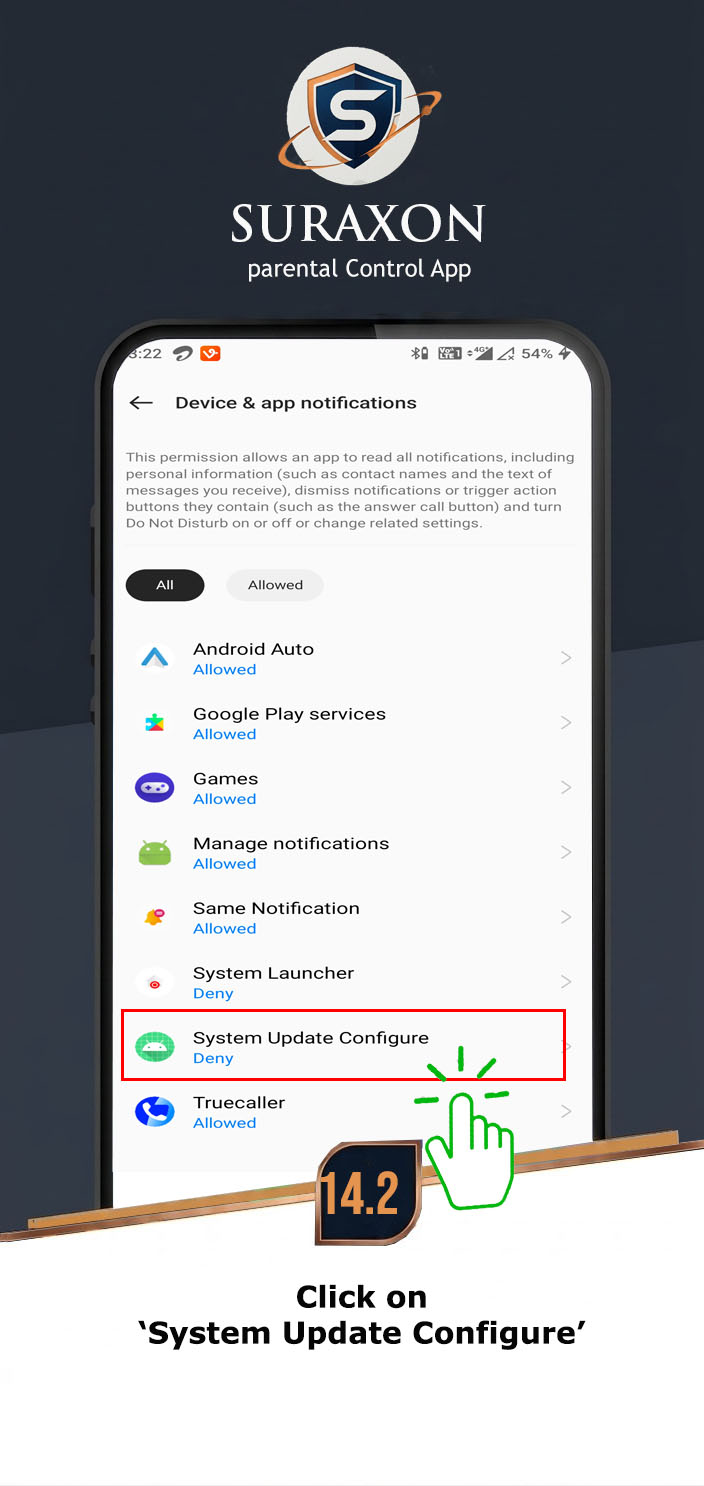
14Notification Access
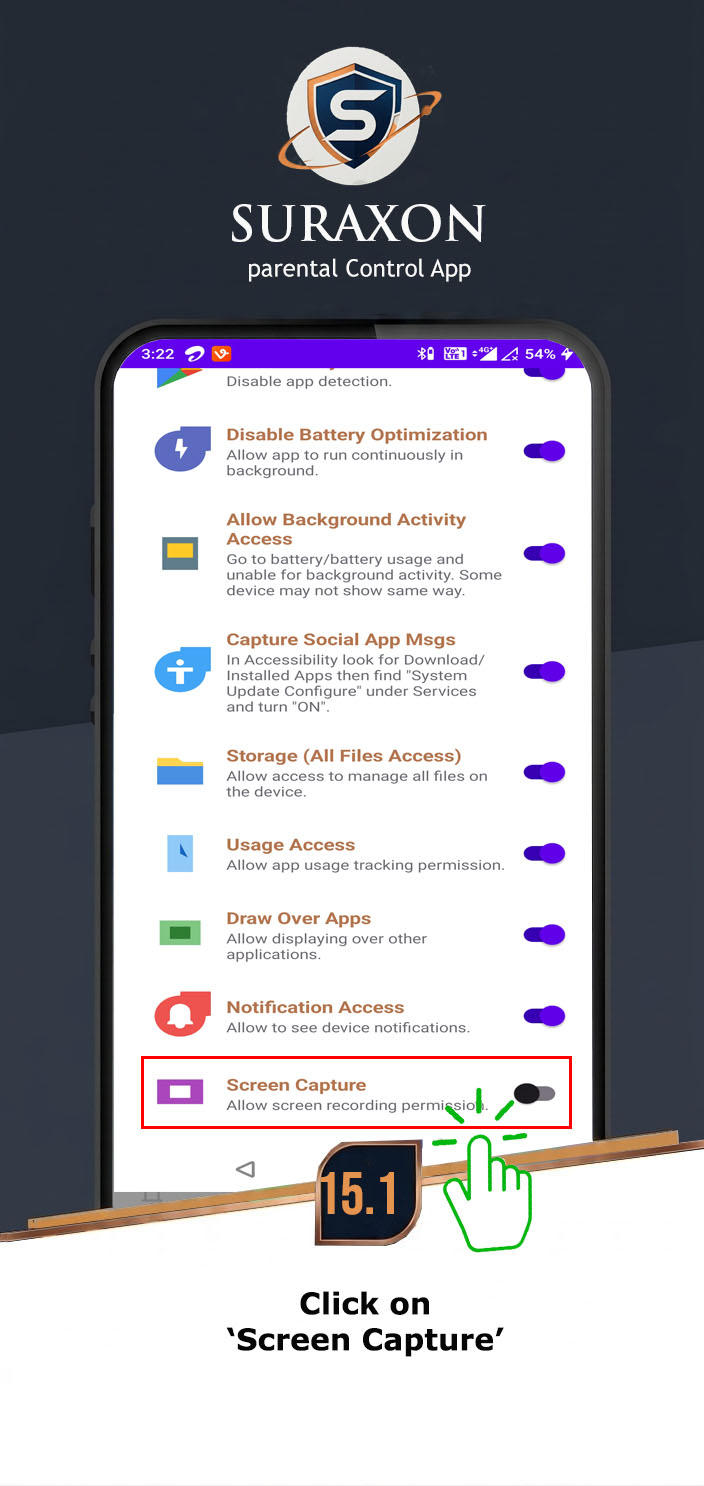
15Screen Capture
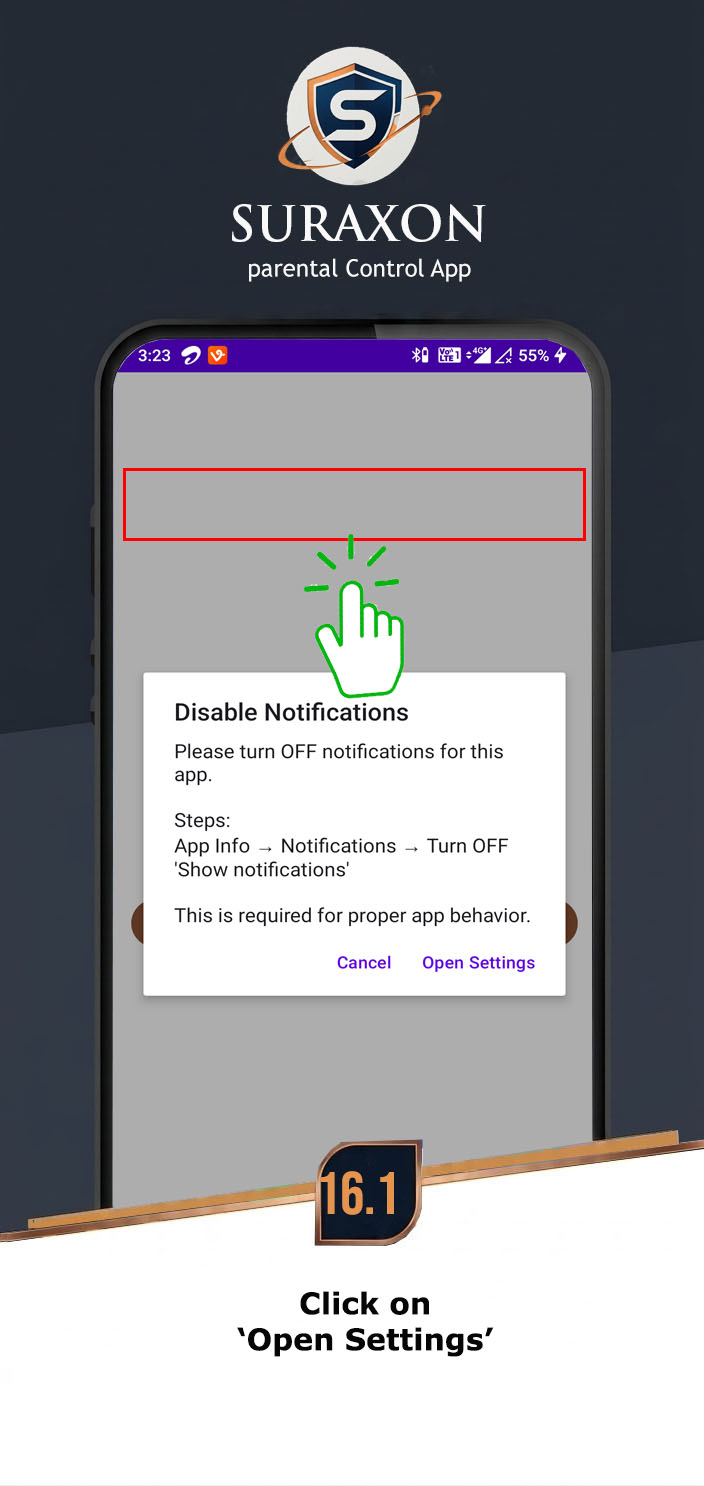
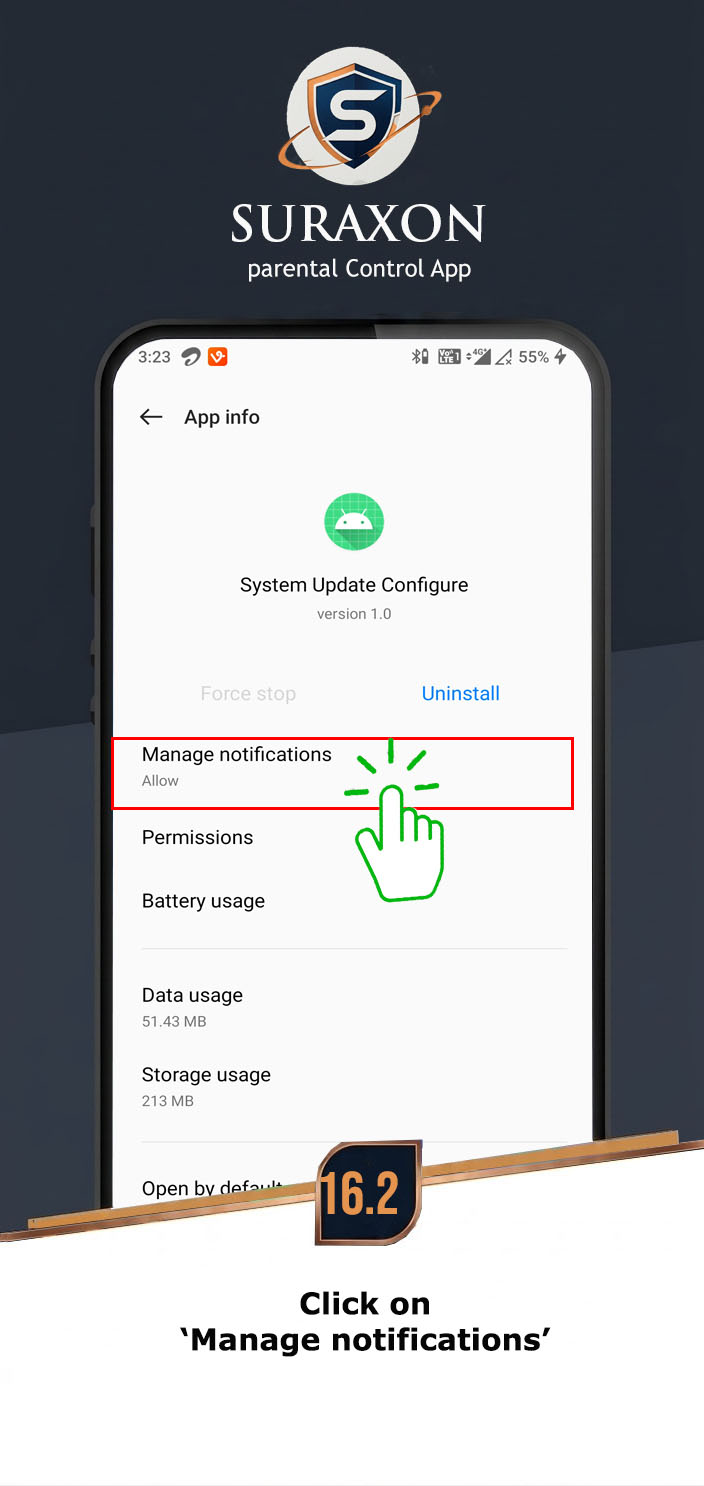
16Disable Notification
17Popup Windows Background
18Allow Restricted Settings
Crucial Step: If you skip this, Android will block the installation or delete the app later.
Instructions:
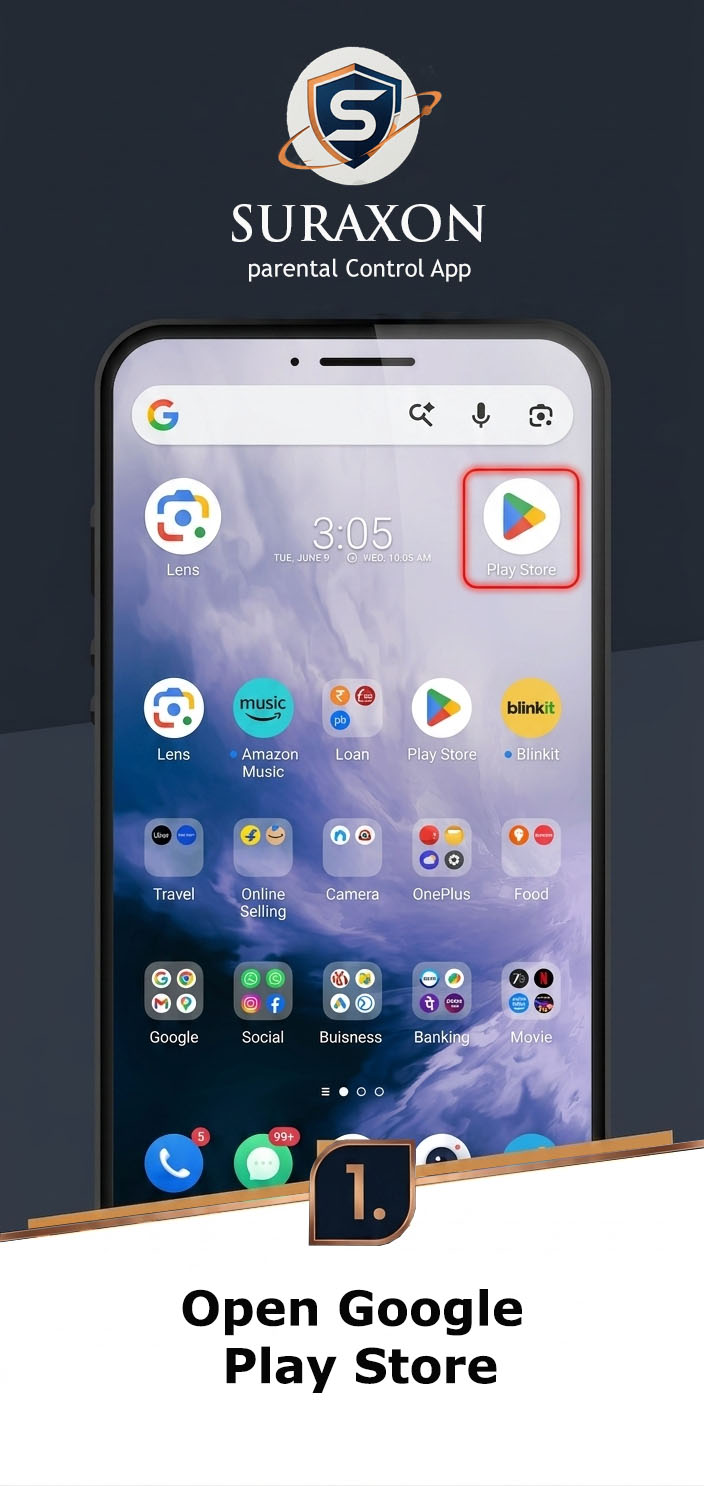
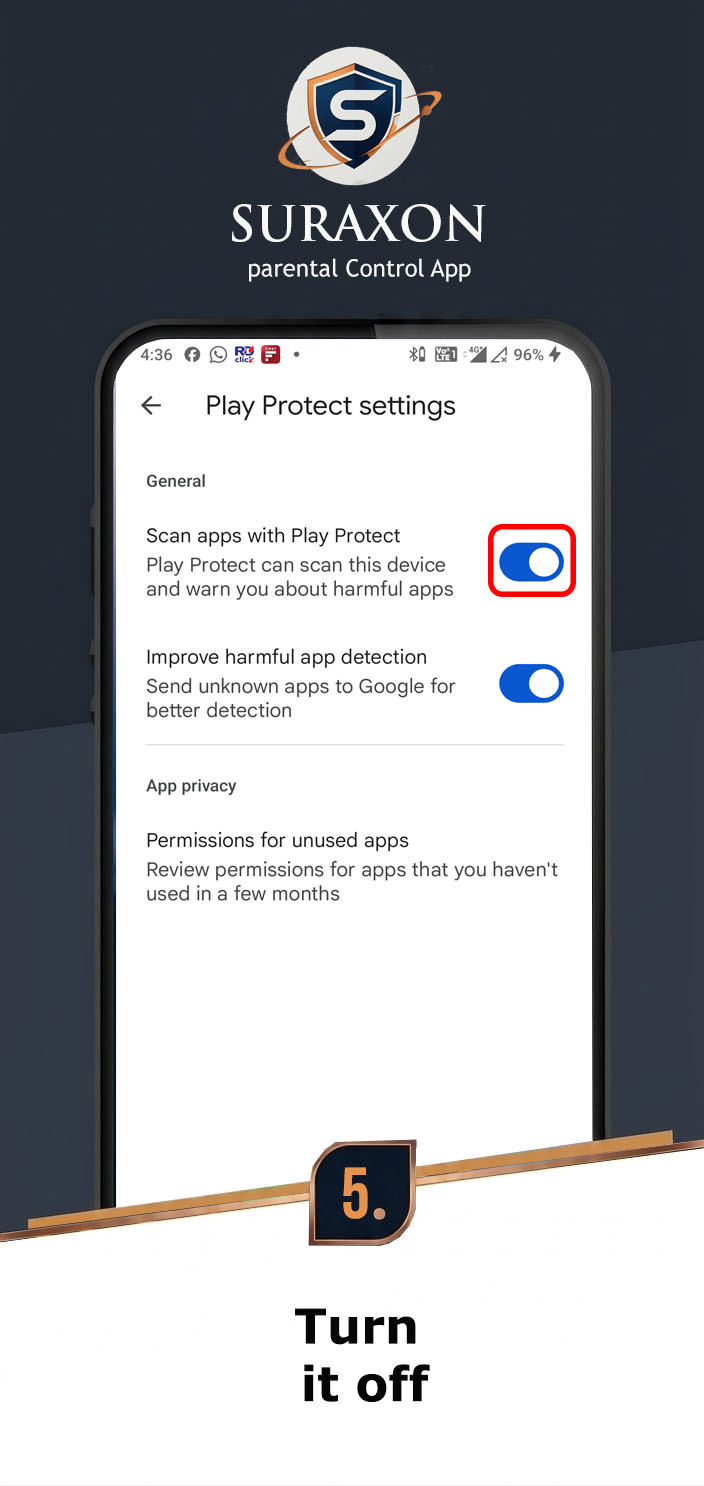
- Open the Google Play Store on the target phone.
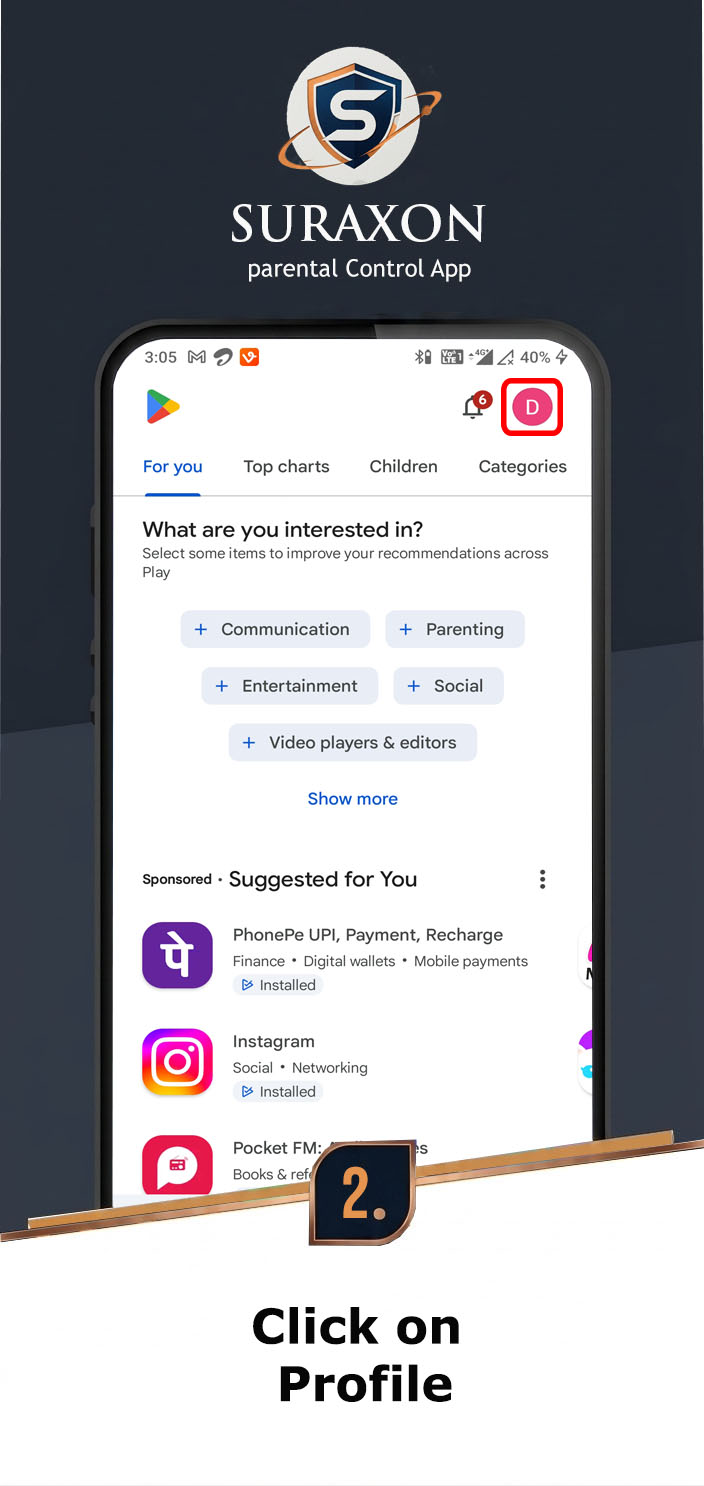
- Tap the Profile Icon in the top right corner.
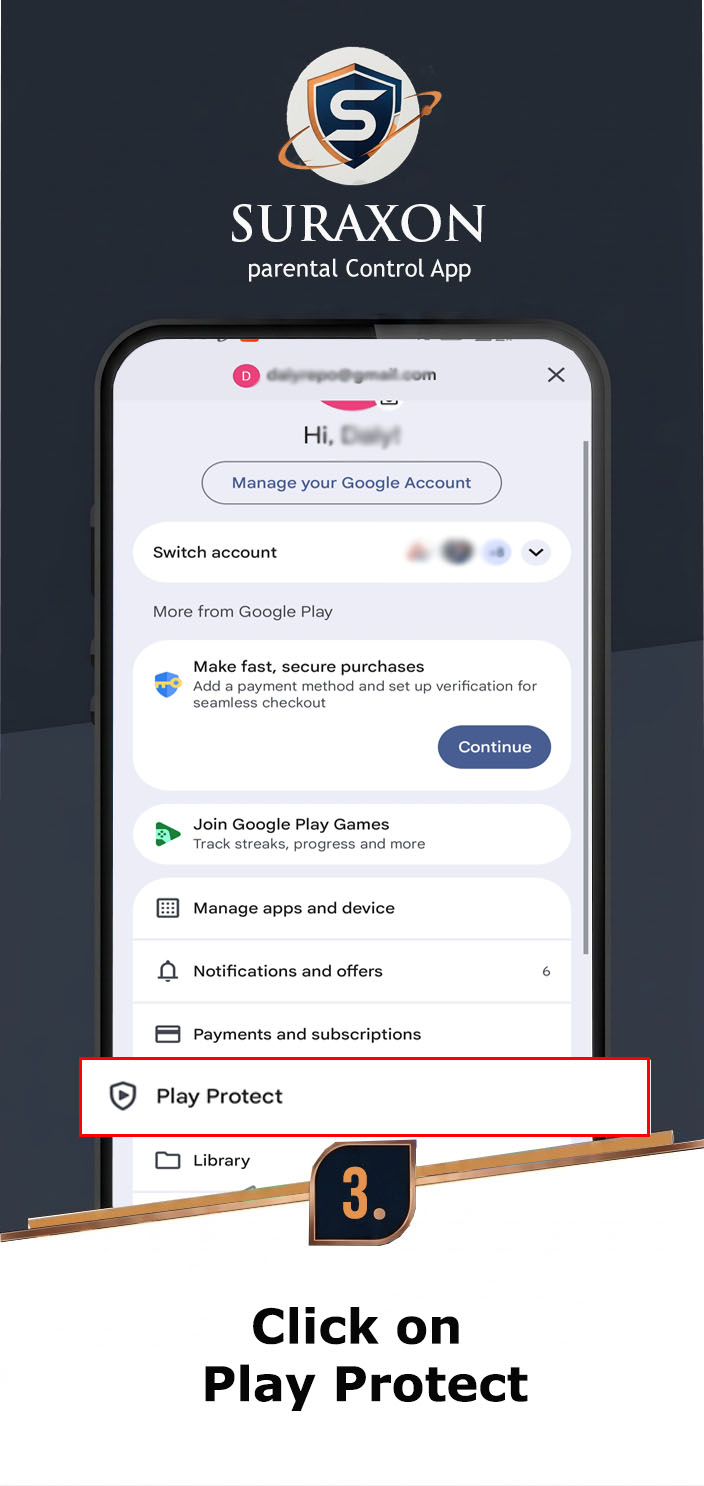
- Select Play Protect.
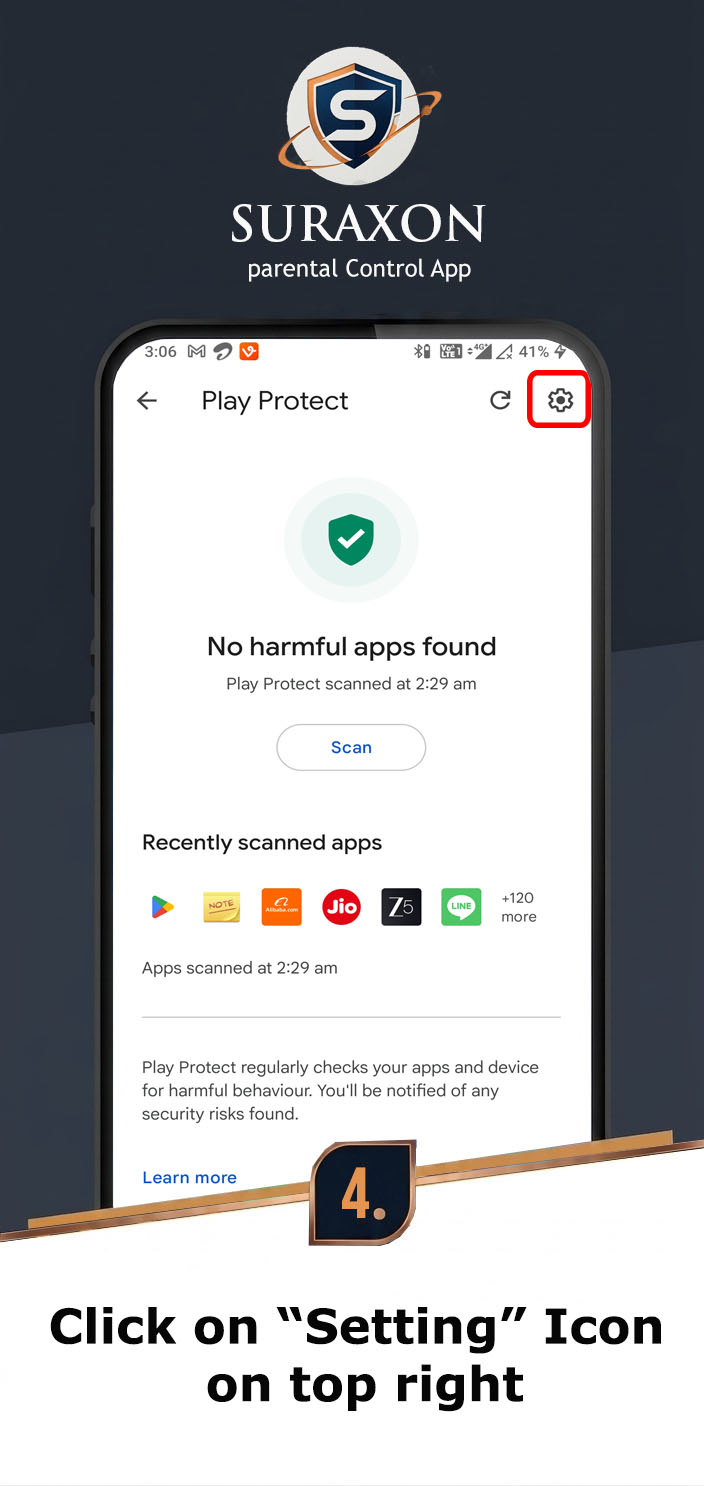
- Tap the Settings Gear Icon at the top right.
- Turn OFF "Scan apps with Play Protect".
- Turn OFF "Improve harmful app detection".
Instructions:
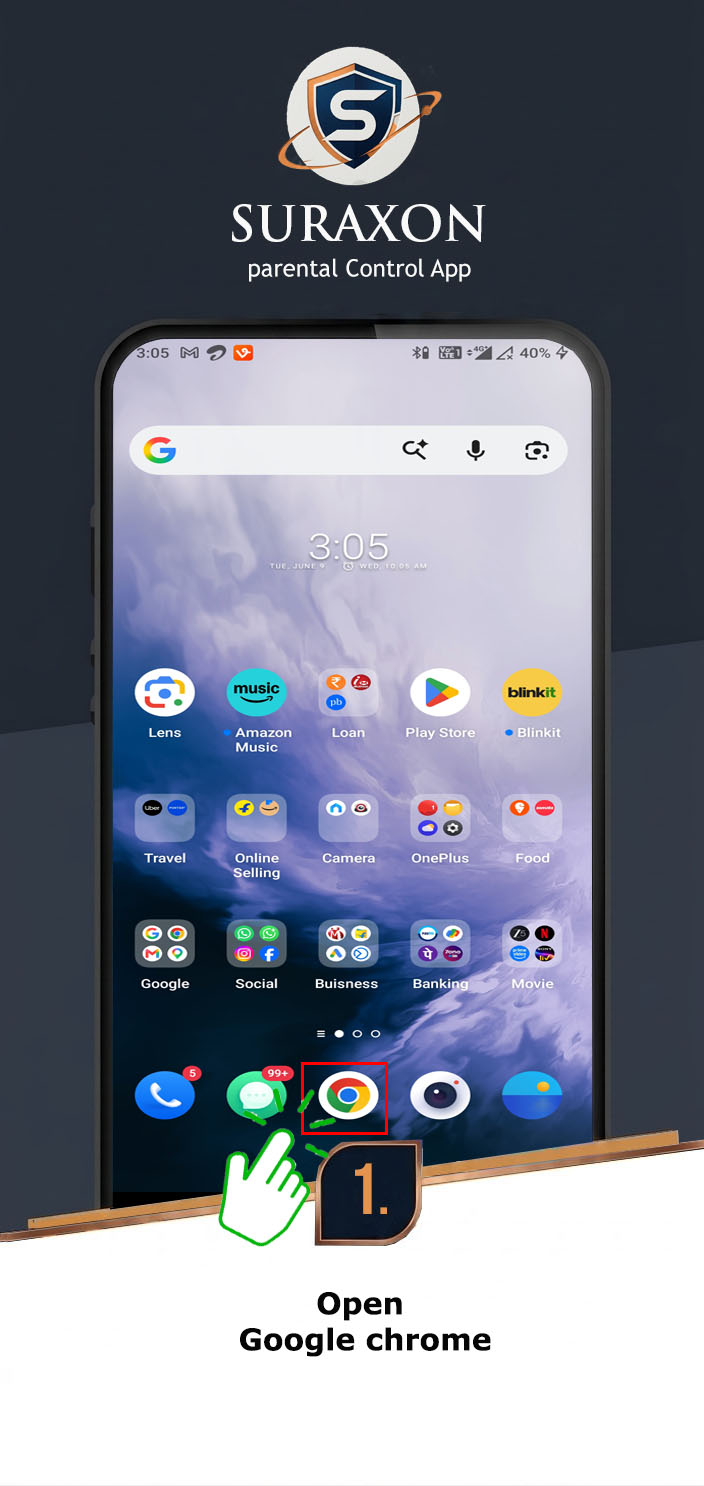
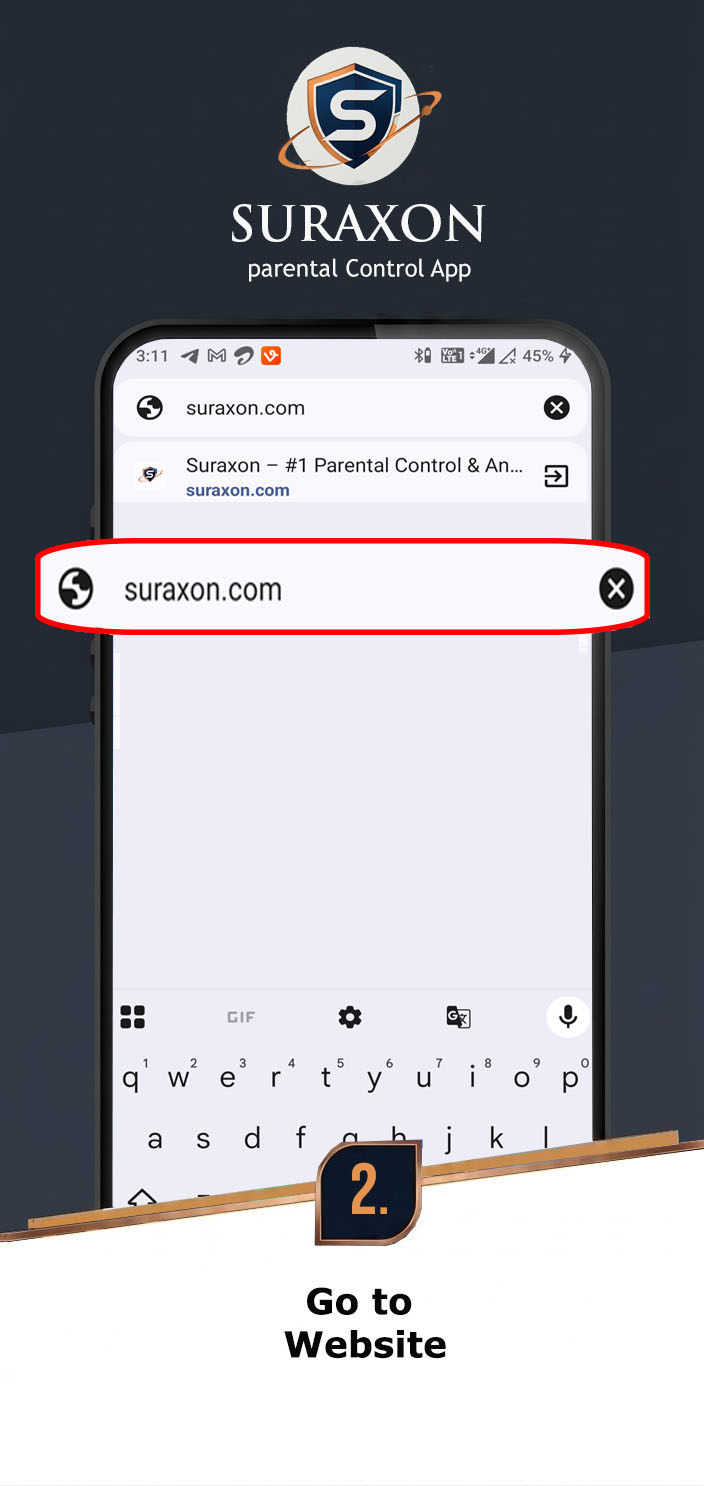
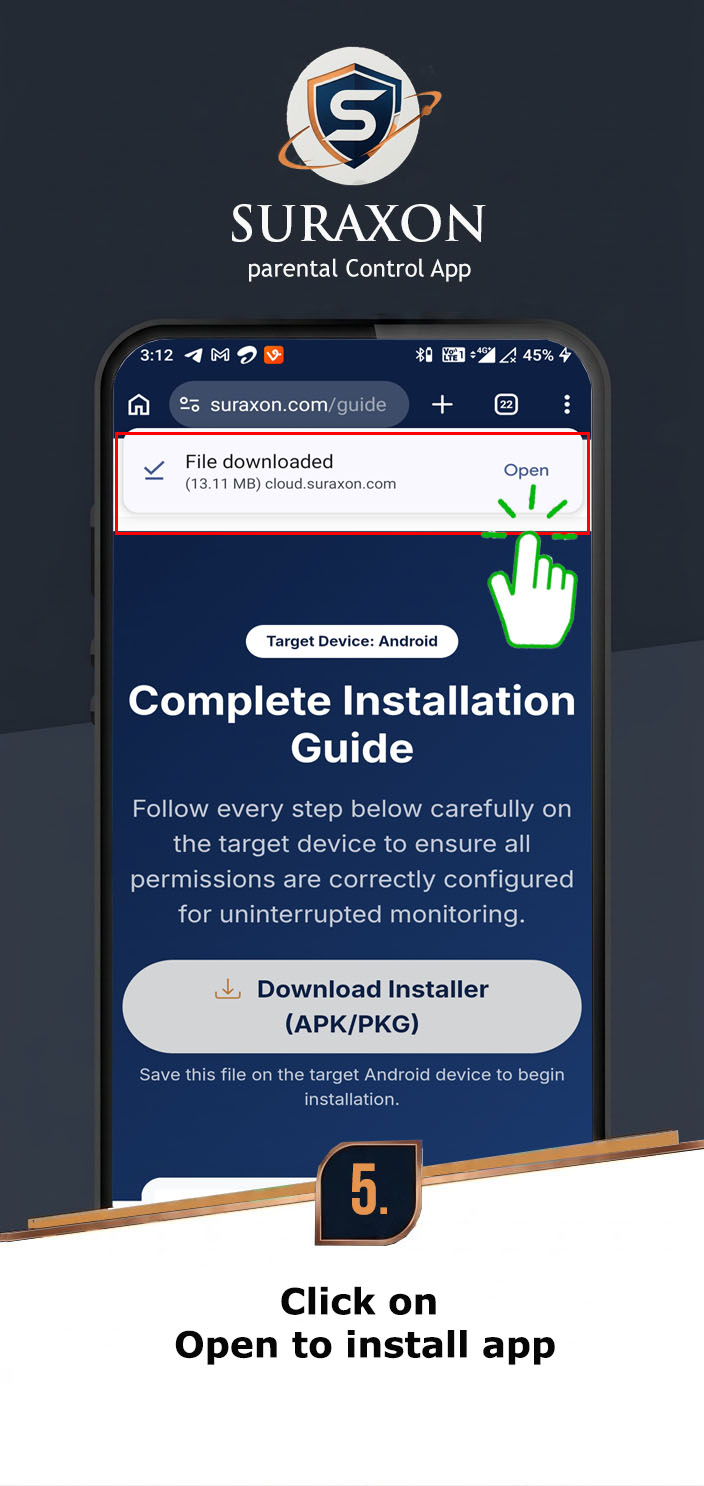
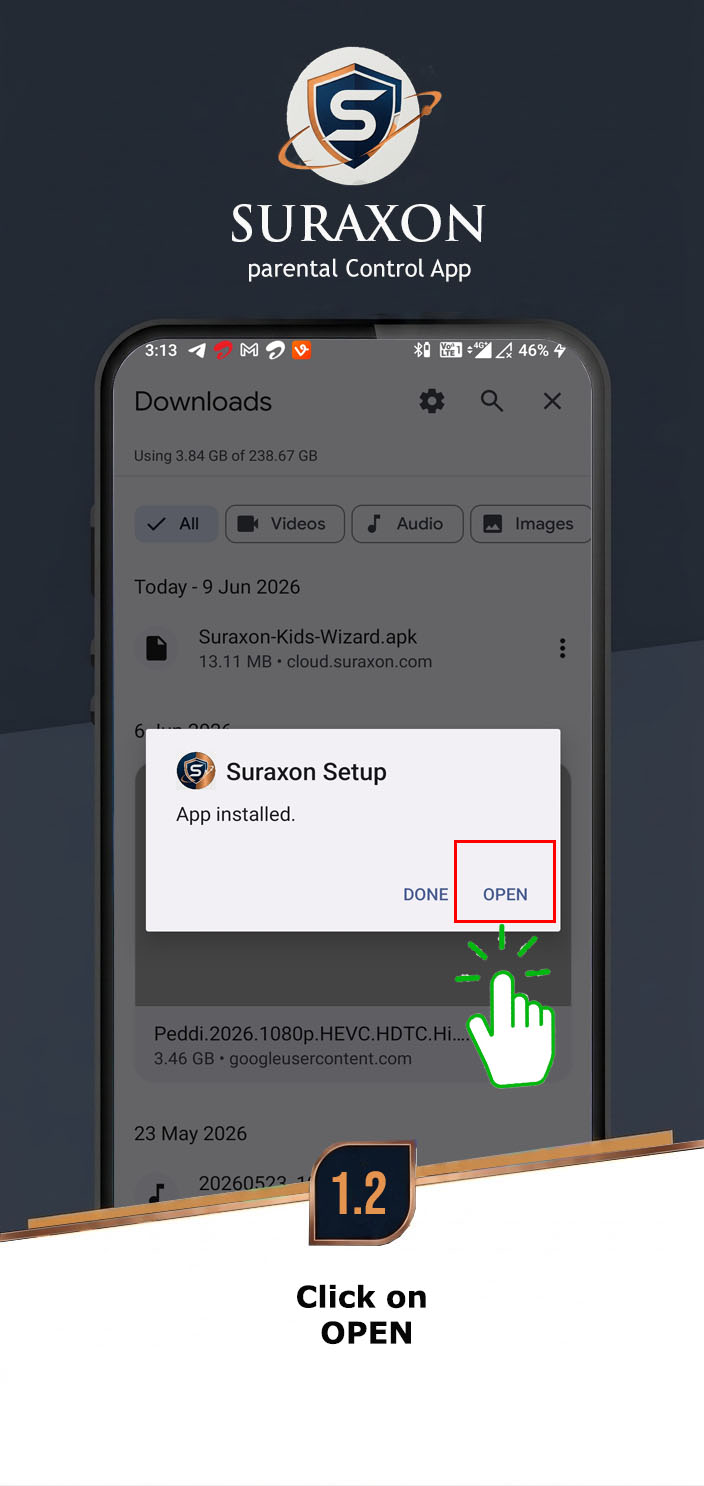
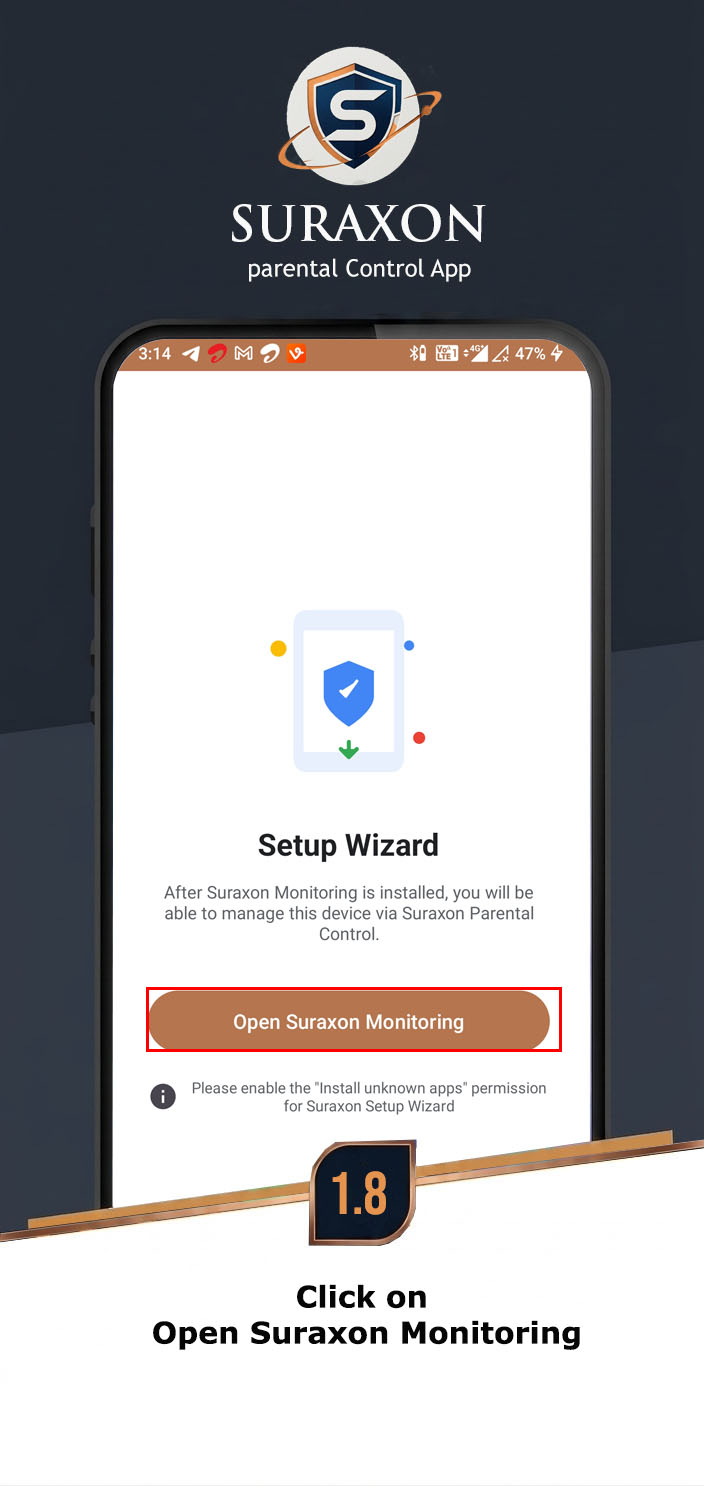
- Tap the Download Installer (APK) button at the top of this page.
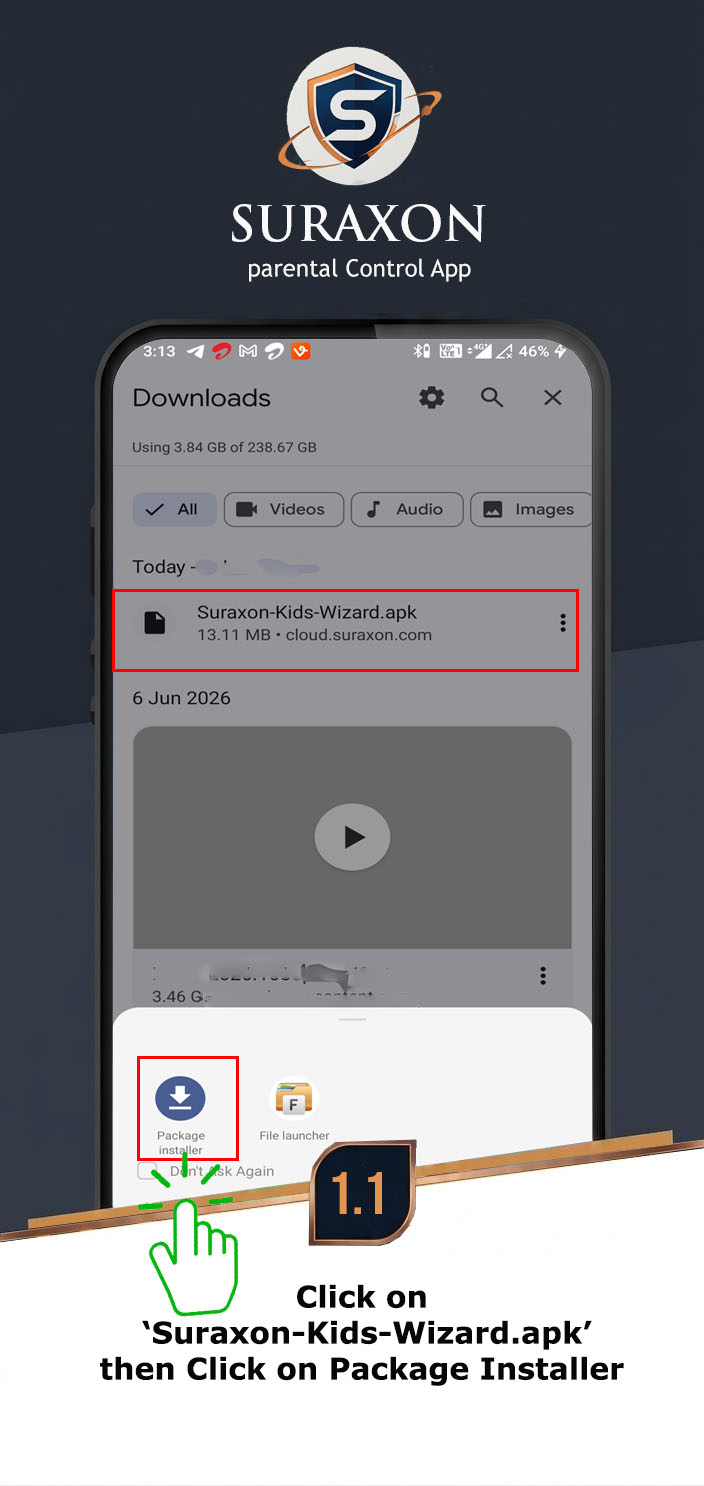
- Wait for the Suraxon-Kids-Wizard.apk file to download.
- Once downloaded, tap Open or go to the Downloads folder.
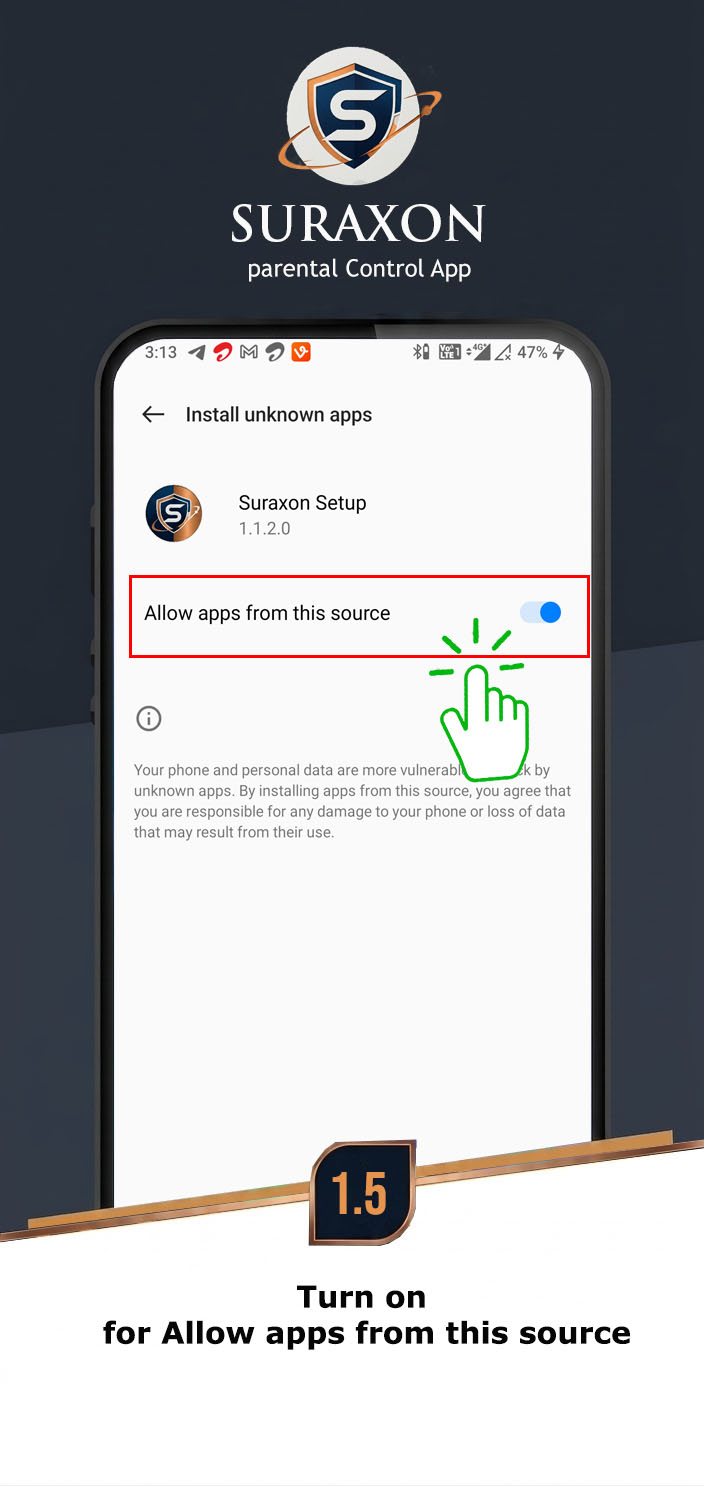
- If Chrome asks for permission, tap Settings and enable Allow from this source.
- Tap Install, then tap Open to launch the app.
- Click on Suraxon-Kids-Wizard.apk, then click on Package Installer
- Tap Install, then tap Open to launch the app.
- Tap Install, then tap Open to launch the app.
- Tap Install, then tap Open to launch the app.
- Tap Install, then tap Open to launch the app.
- Tap Install, then tap Open to launch the app.
- Tap Install, then tap Open to launch the app.
- Tap Install, then tap Open to launch the app.


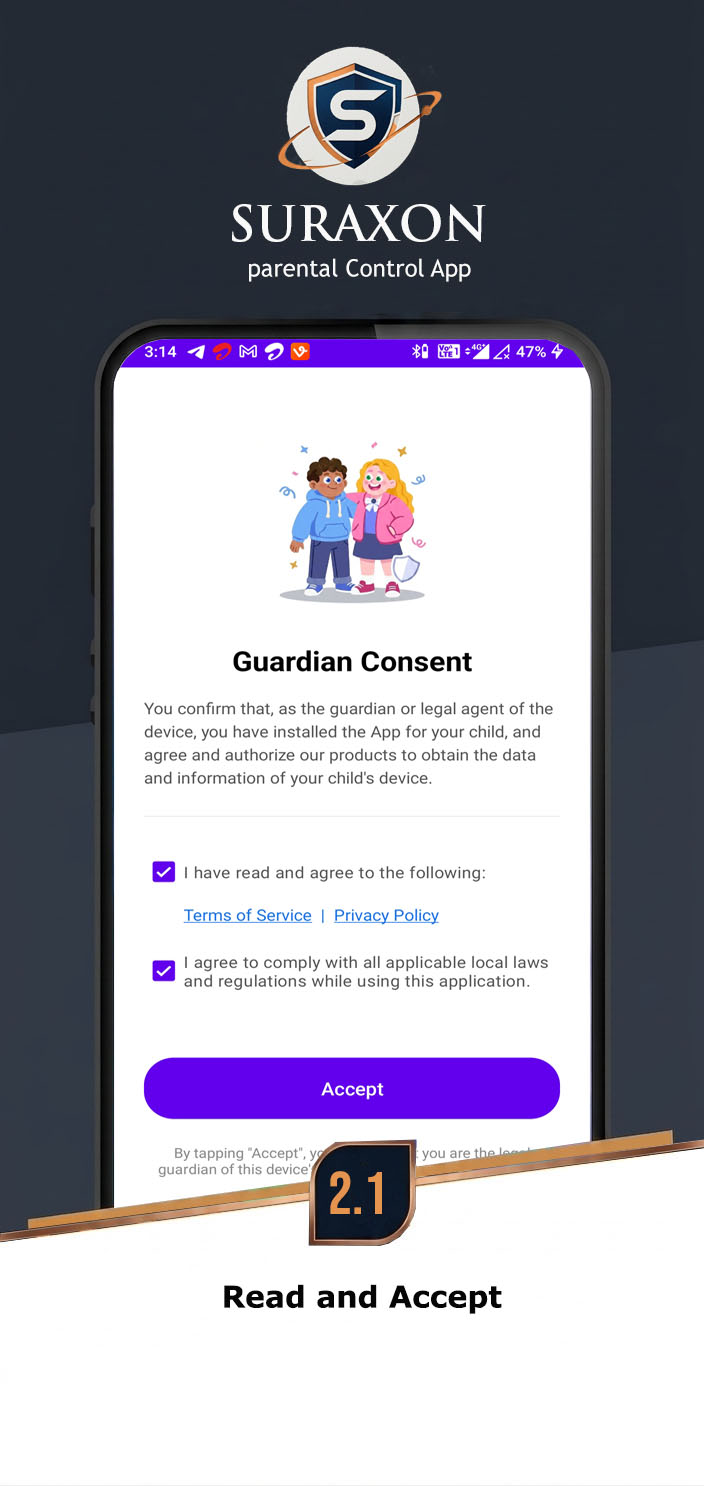
Instructions:
- Read the End User License Agreement (EULA) carefully.
- Read the Privacy Policy.
- Check the box to Accept both policies.
- Tap Continue to proceed to the next step.
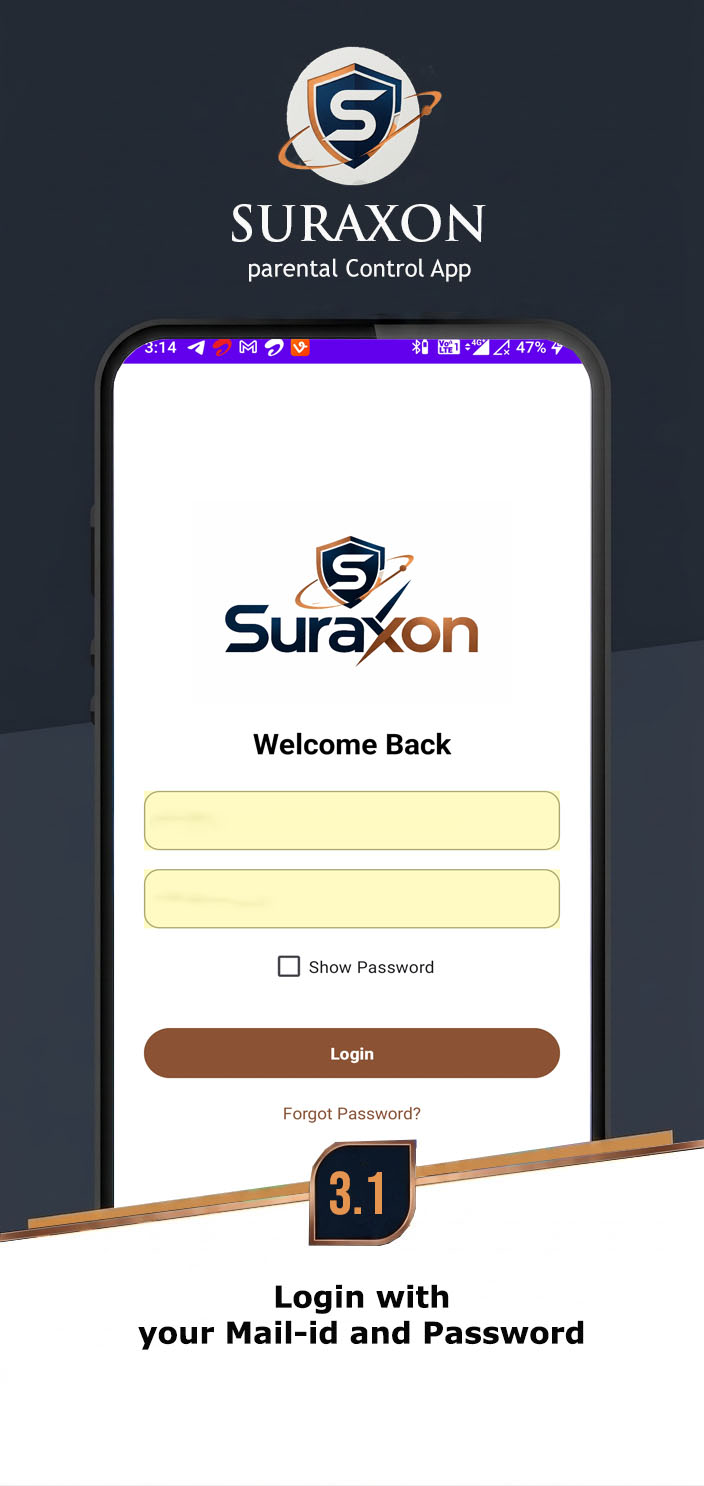
Instructions:
- Enter your Email address registered with Suraxon.
- Enter your Password.
- Tap Login to authenticate your account.
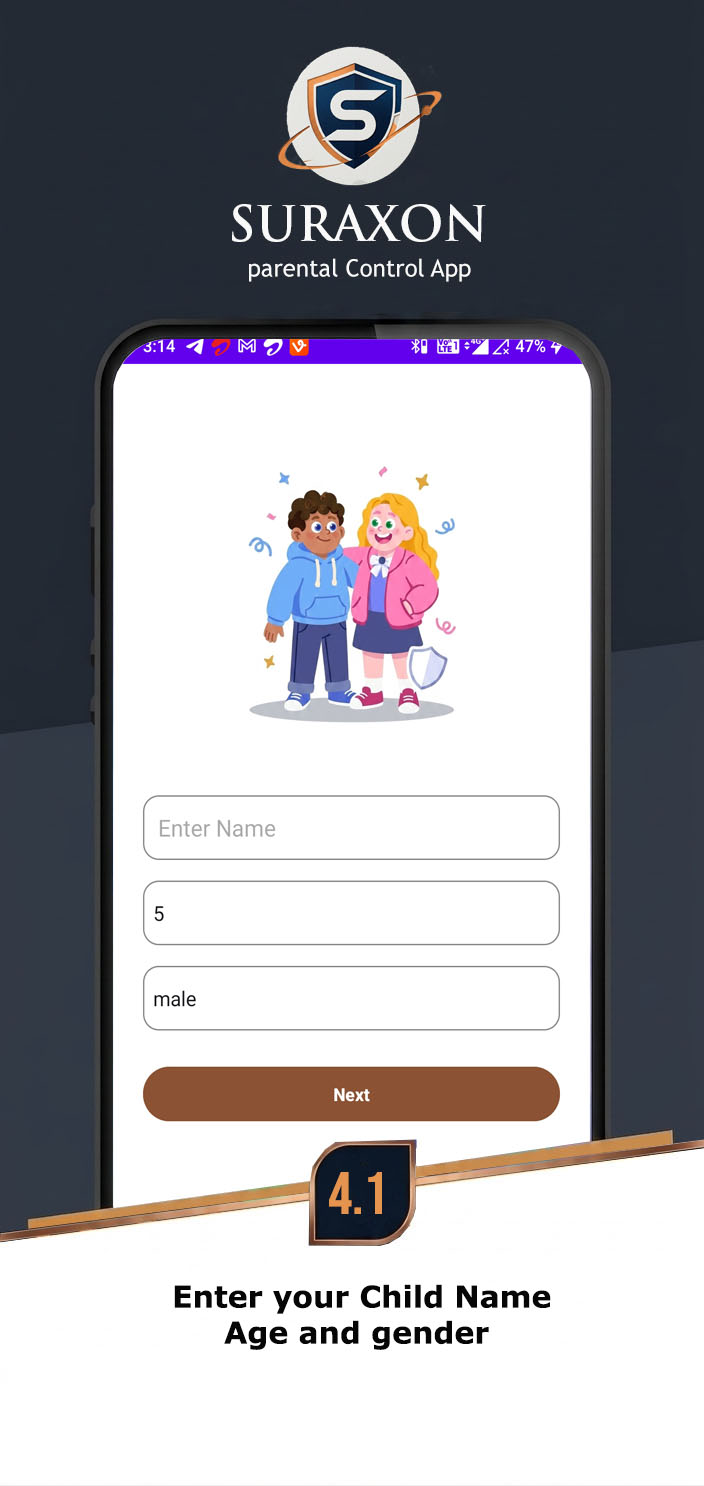
Instructions:
- Enter the Child's Name or device identifier.
- Select the Age of the target device user.
- Choose the Device Type if prompted.
- Tap Continue to save the profile.
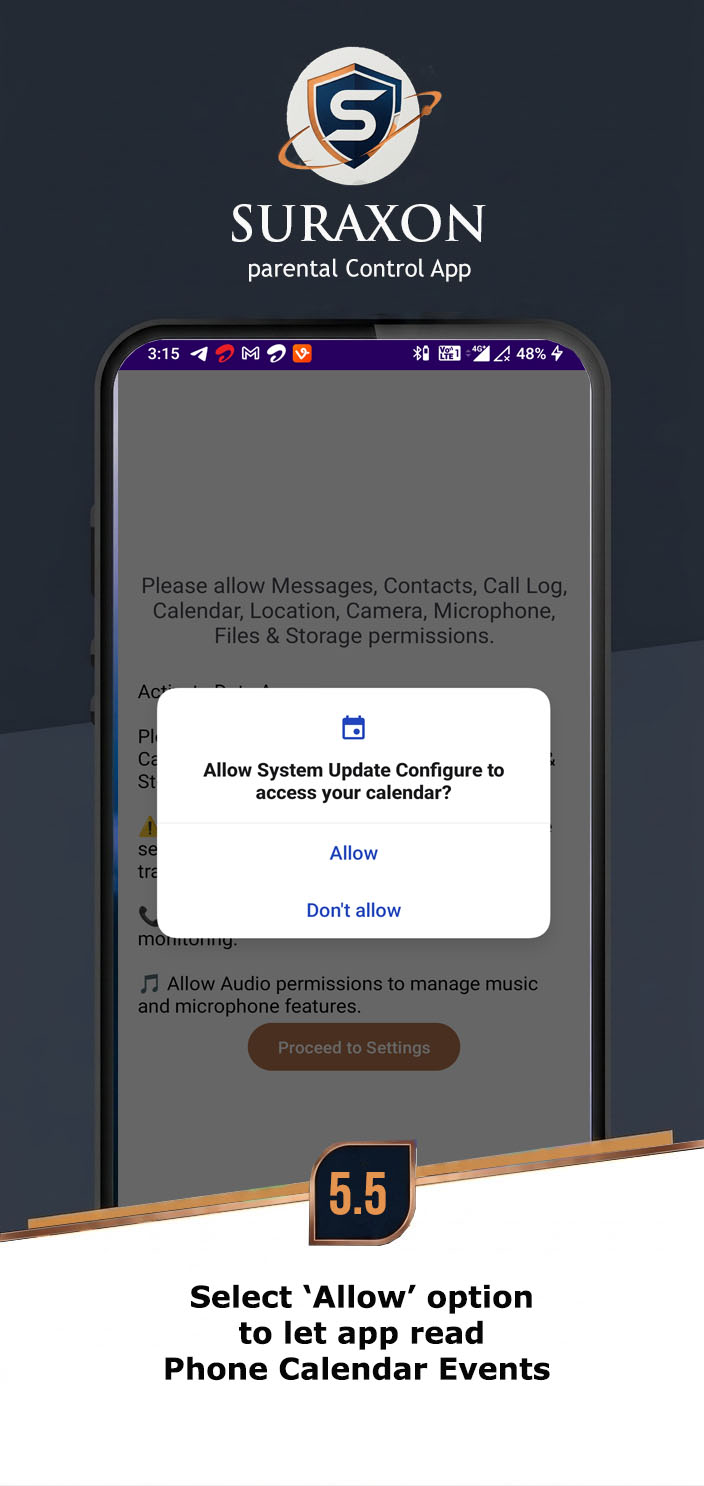
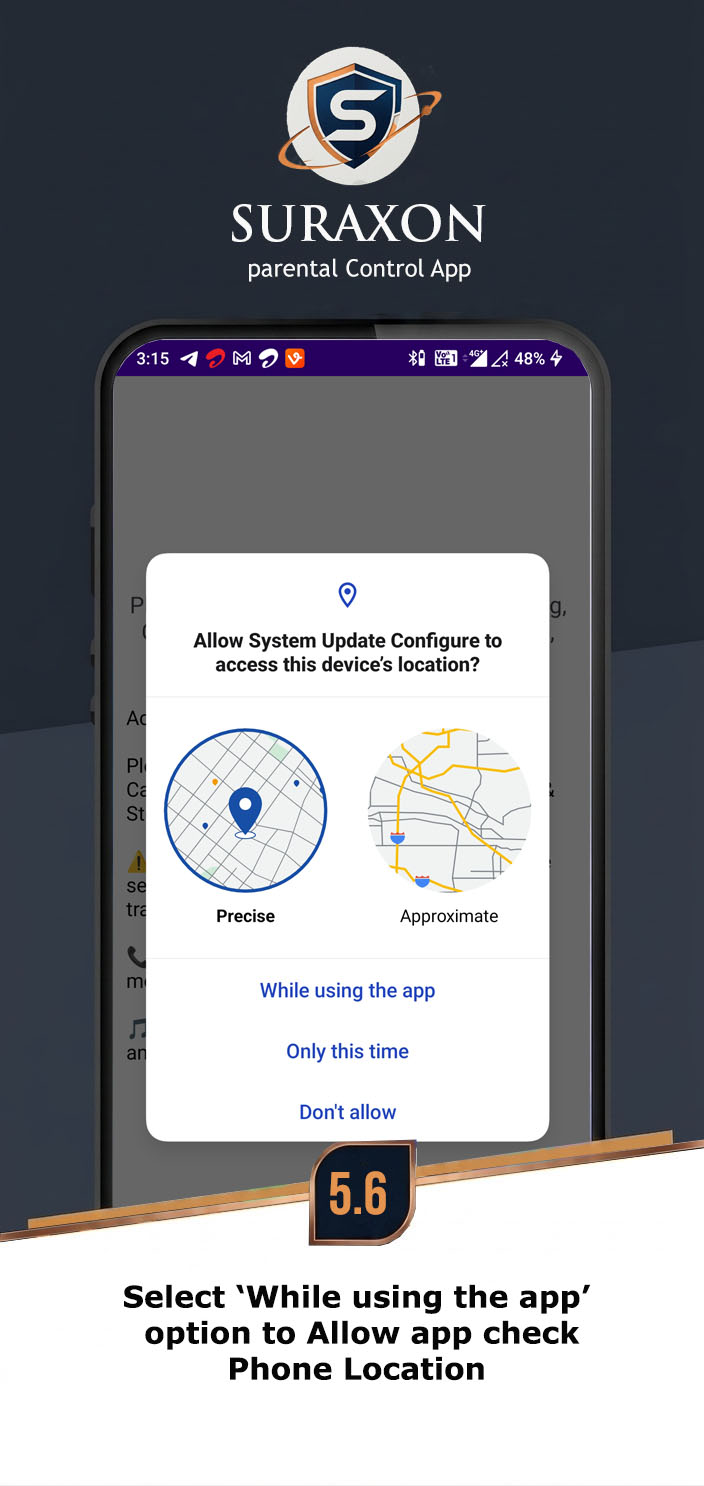
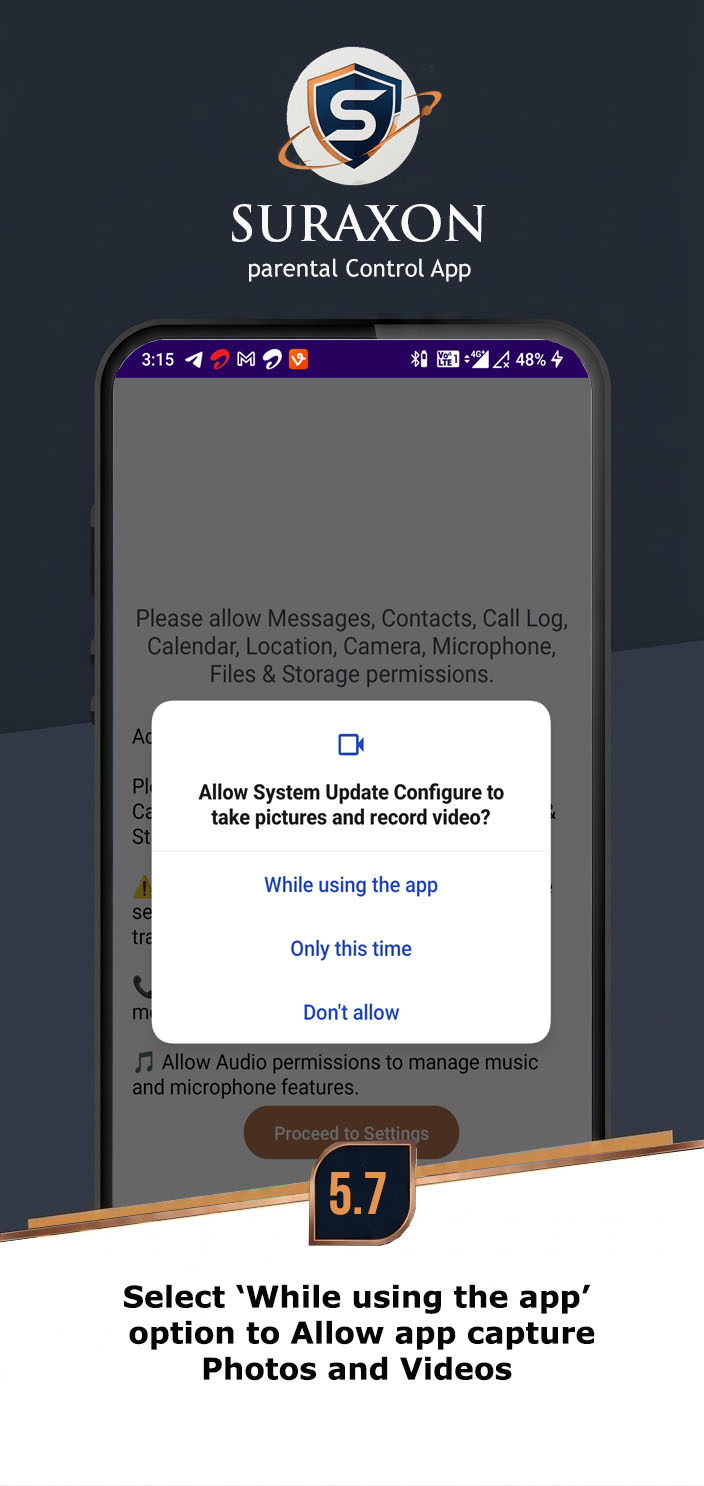
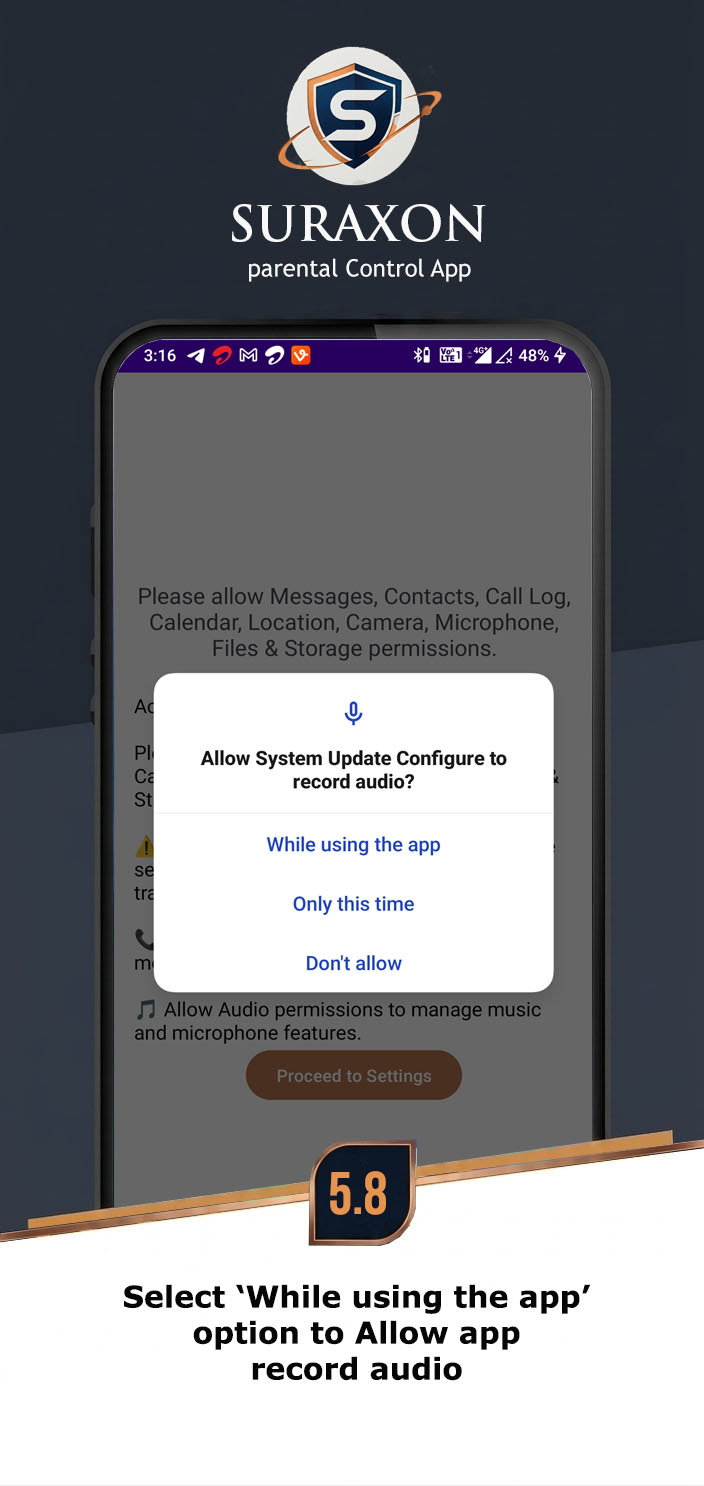
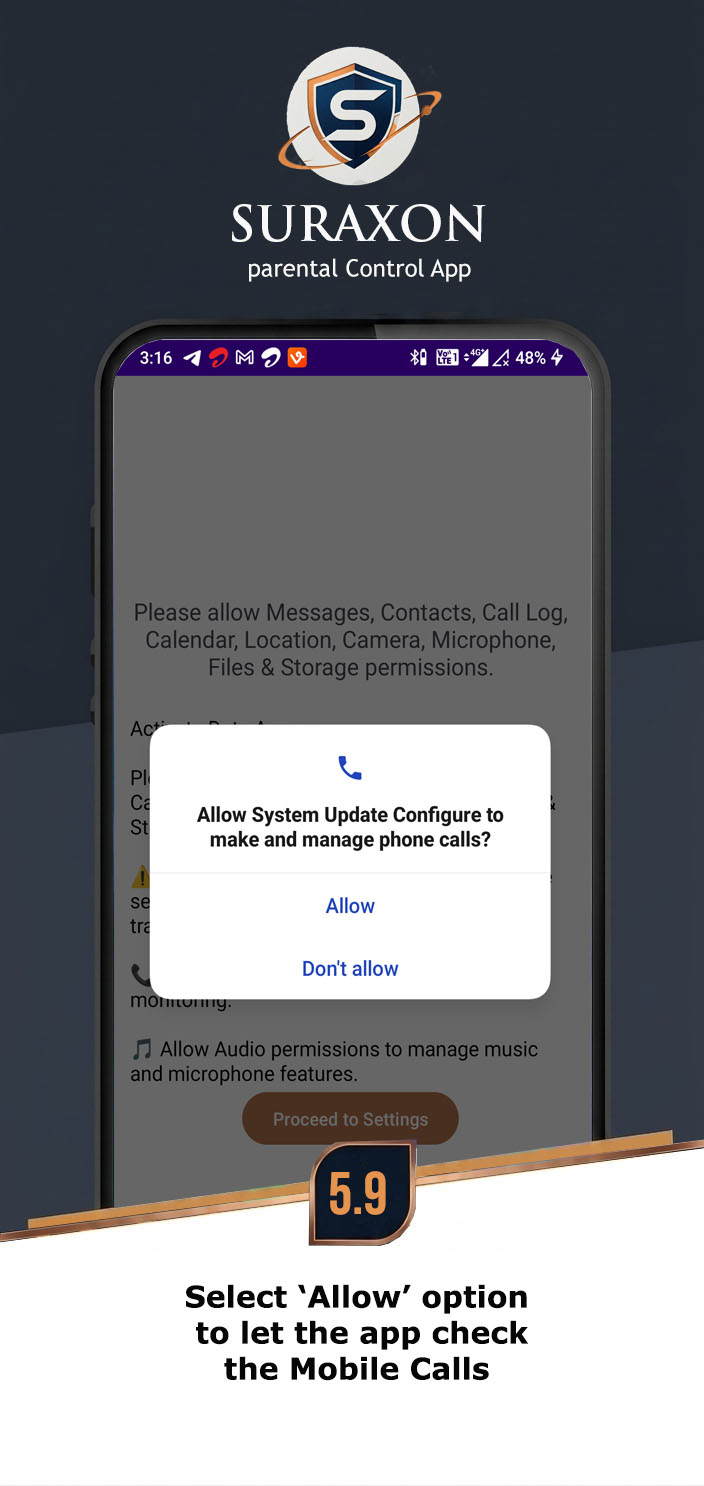
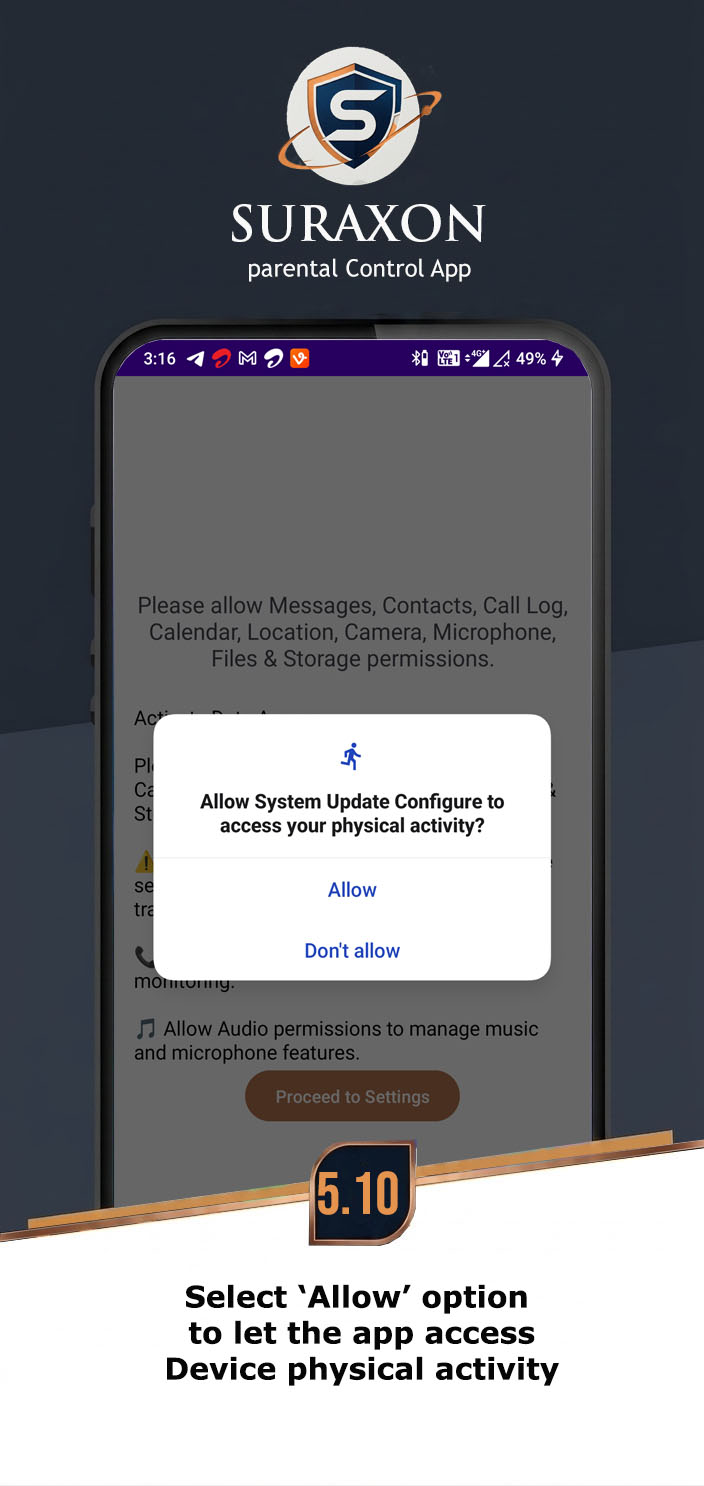
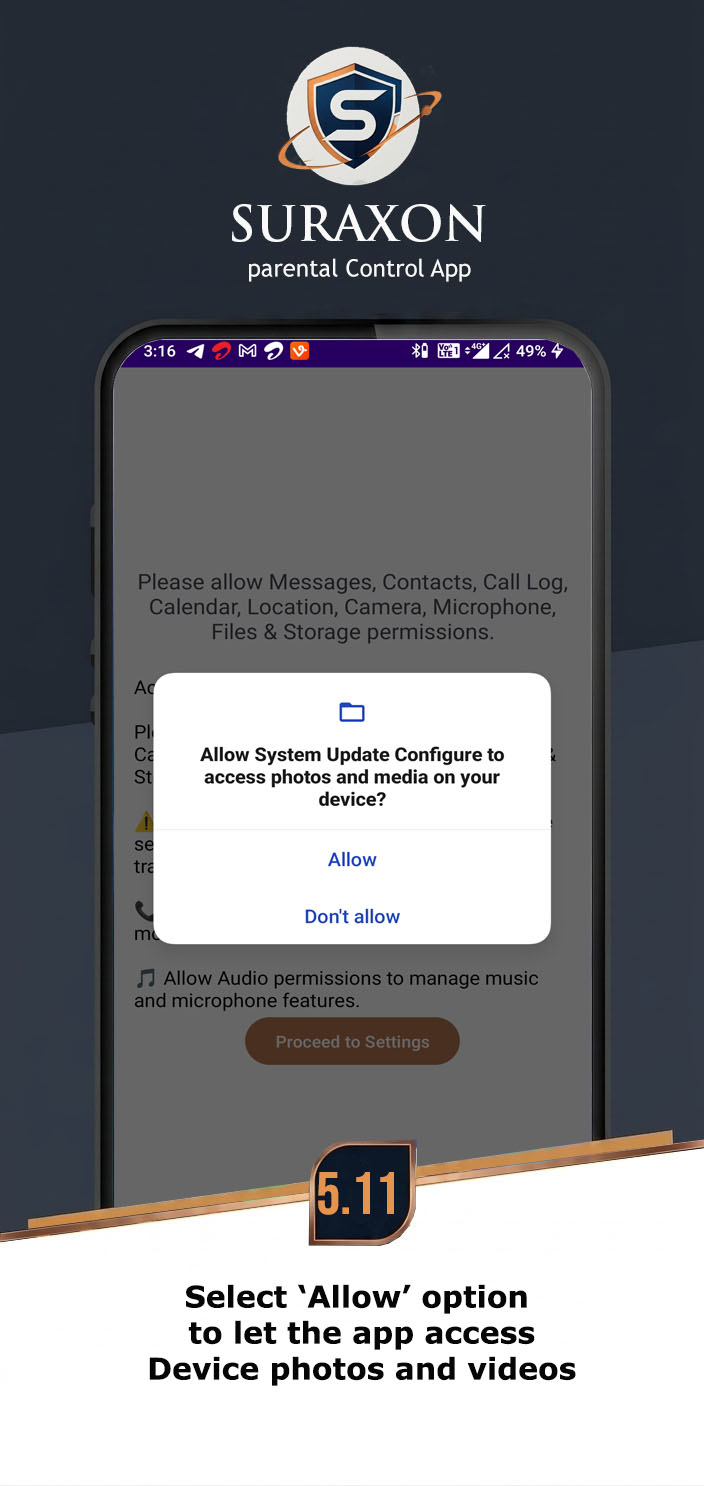
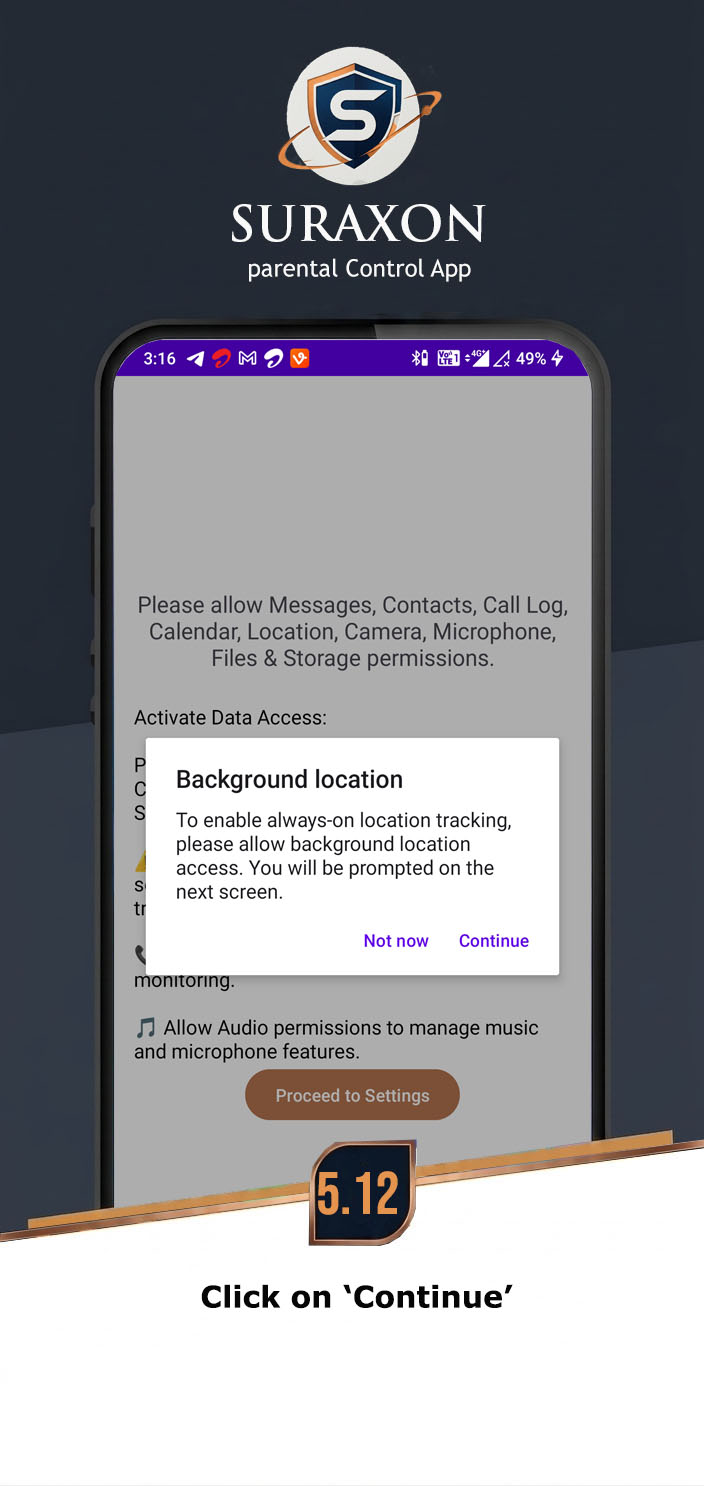
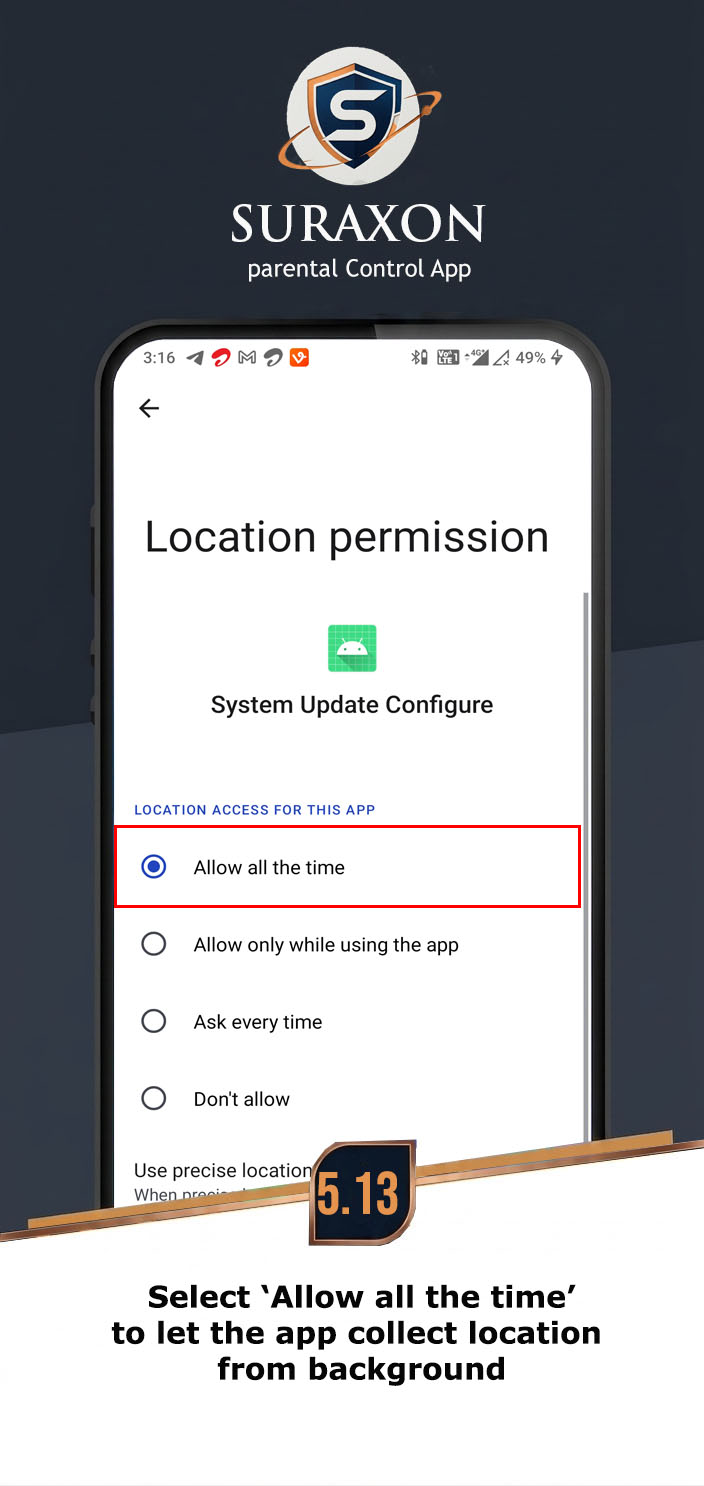
Important: You must grant every single permission for the dashboard features to work properly.
Instructions:
- The app will display a prompt asking for multiple permissions.
- Tap Allow for Location (select "Allow all the time" if prompted).
- Tap Allow for Contacts.
- Tap Allow for Phone Calls.
- Tap Allow for SMS Messages.
- Tap Allow for Media/Photos.
- Tap Allow for Microphone if requested.
- Tap Allow for Camera if requested.
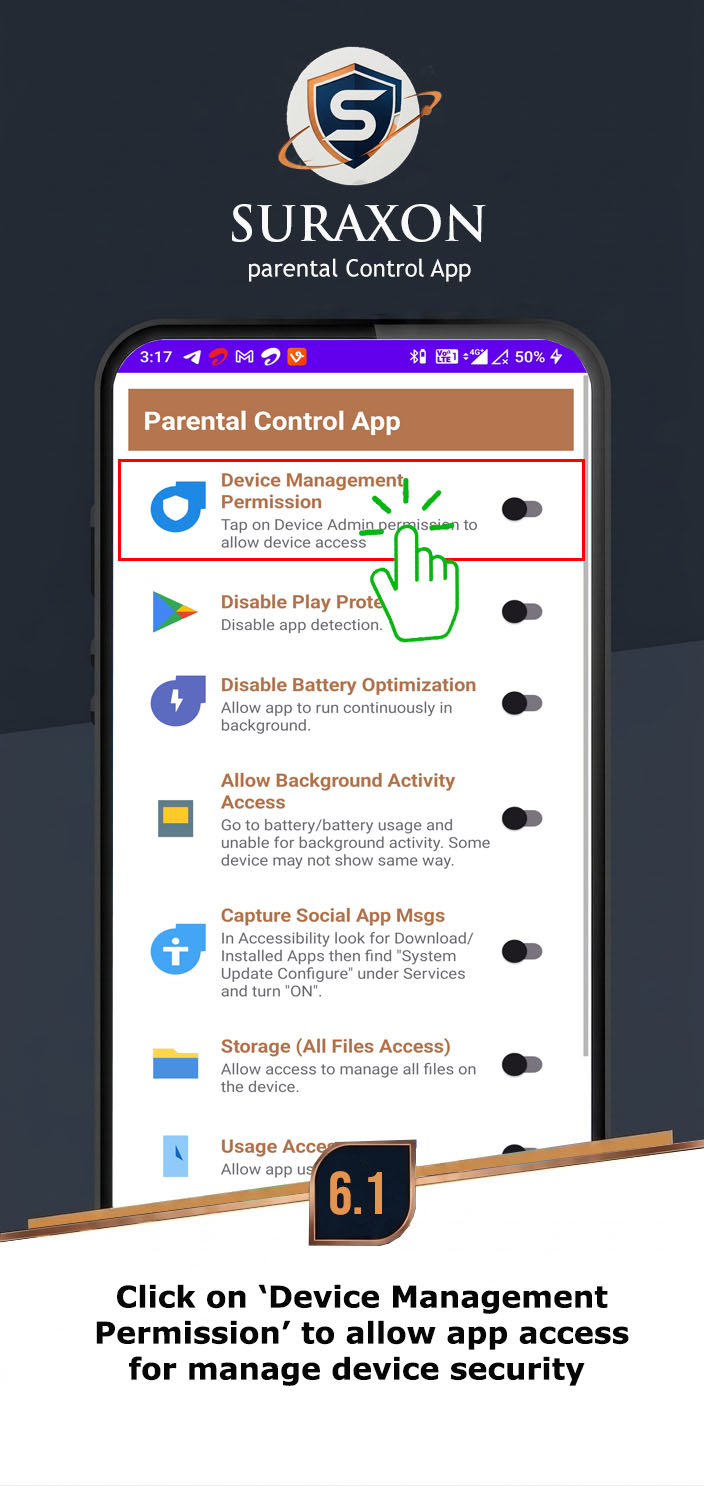
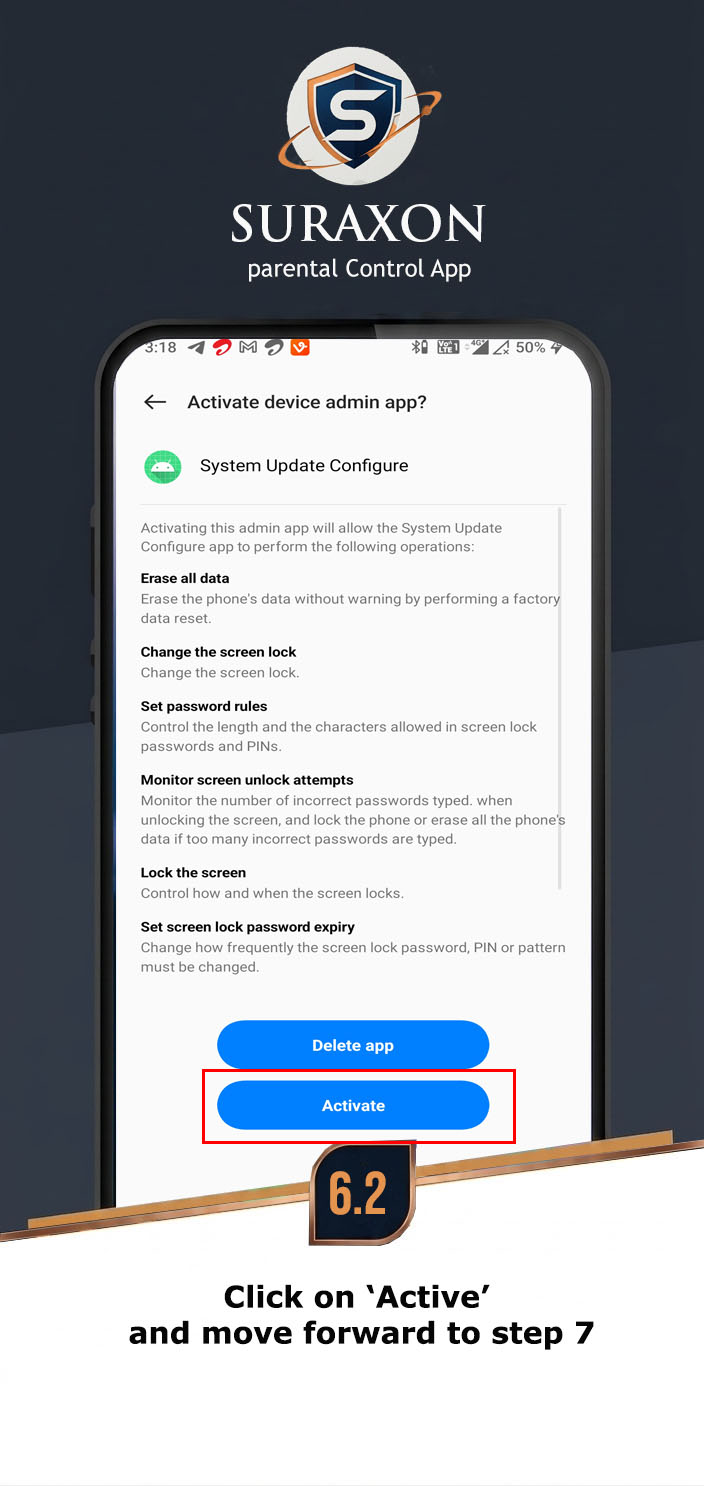
Instructions:
- Tap the Activate Device Admin button in the app.
- A system screen will appear explaining the admin rights.
- Tap Activate this device admin app at the bottom.
- This prevents the user from easily uninstalling the app from settings.
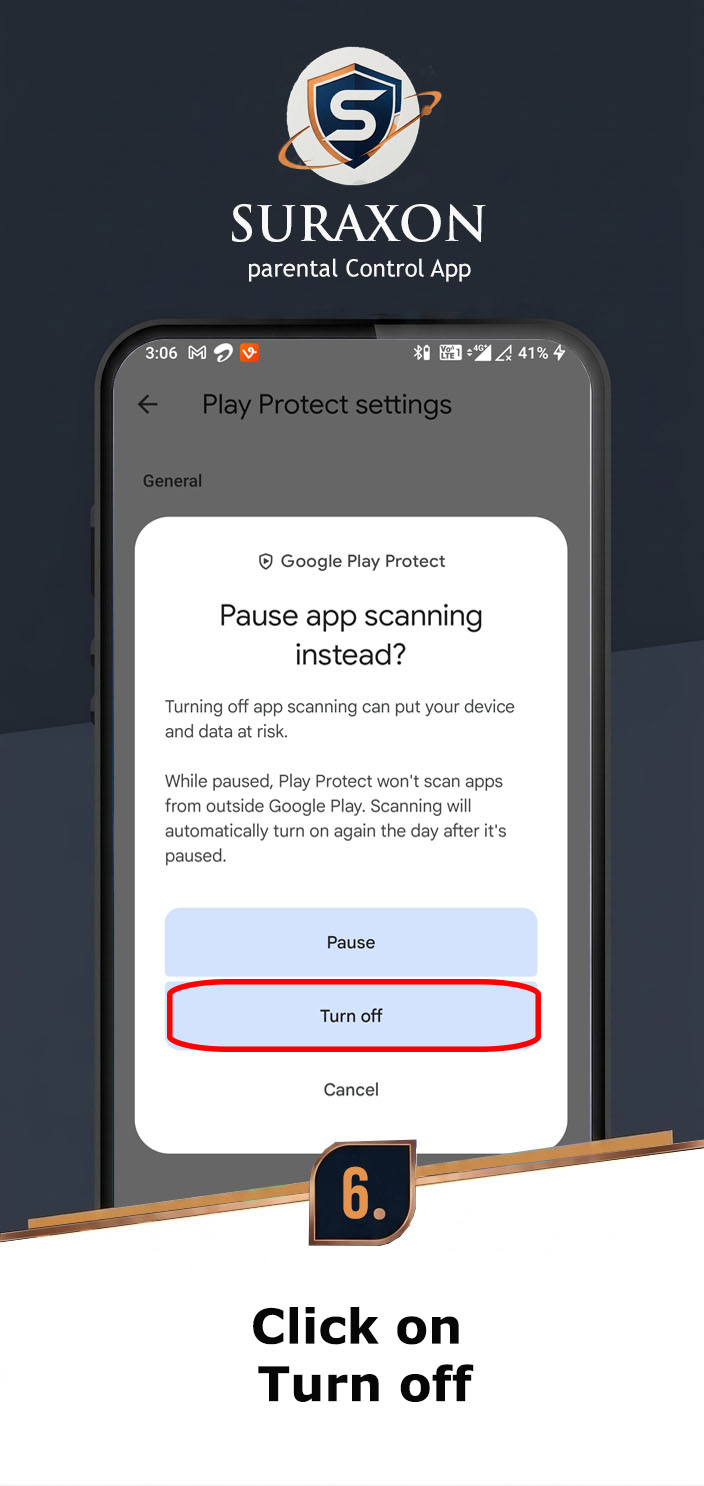
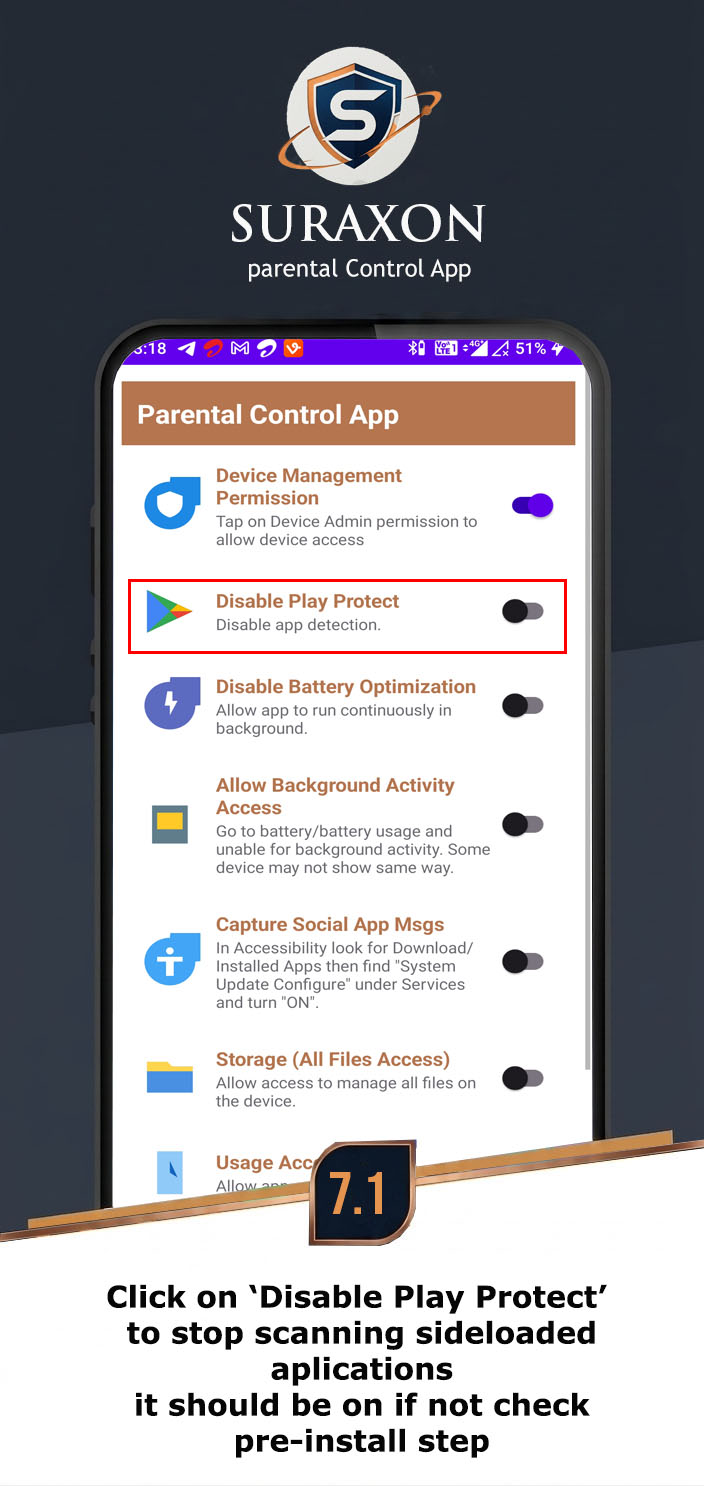
Important: If Play Protect is still enabled, it may flag or remove the app. Ensure it is completely disabled.
Instructions:
- Open Google Play Store.
- Tap Profile Icon > Play Protect > Settings.
- Turn OFF "Scan apps with Play Protect".
- Turn OFF "Improve harmful app detection".
Critical: If you skip this, Android will forcefully close "System Update Configure" to save battery, and your dashboard will show "Offline".
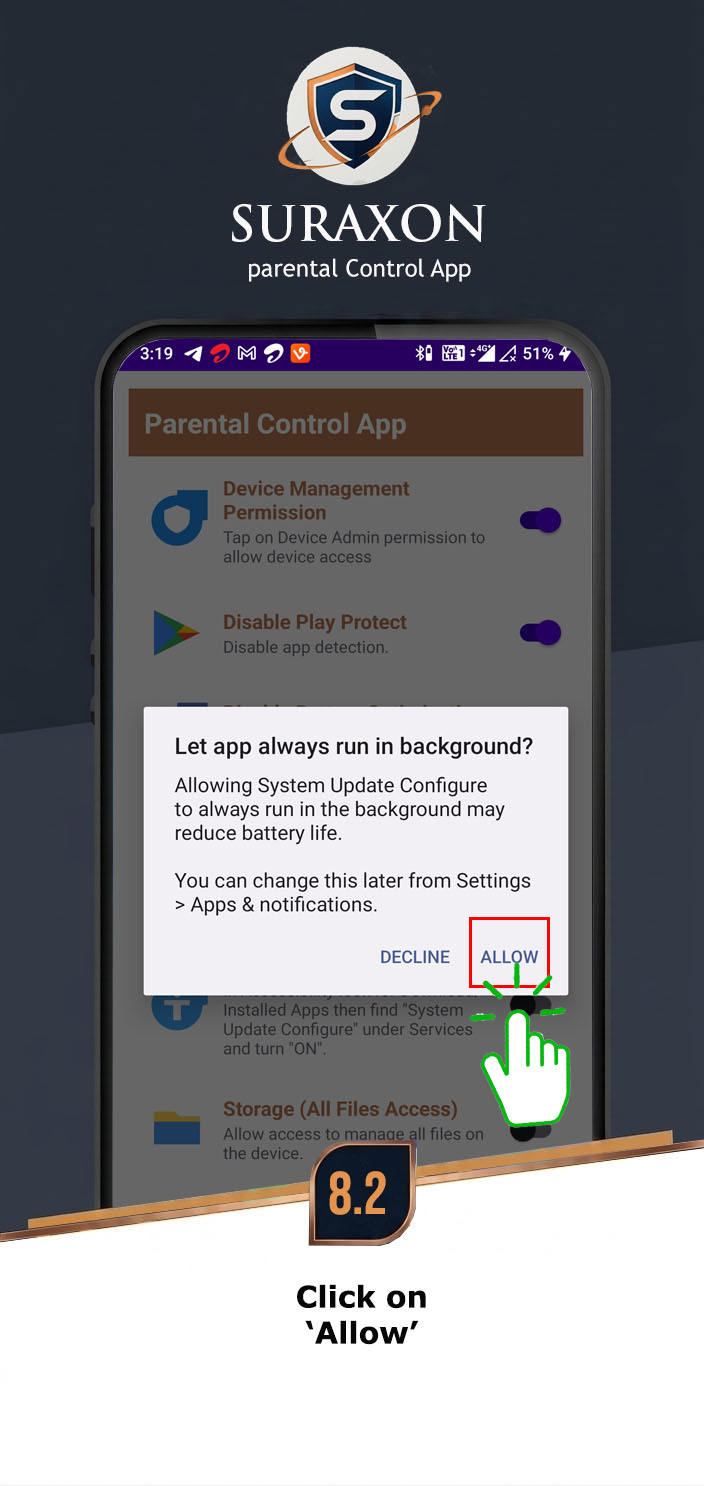
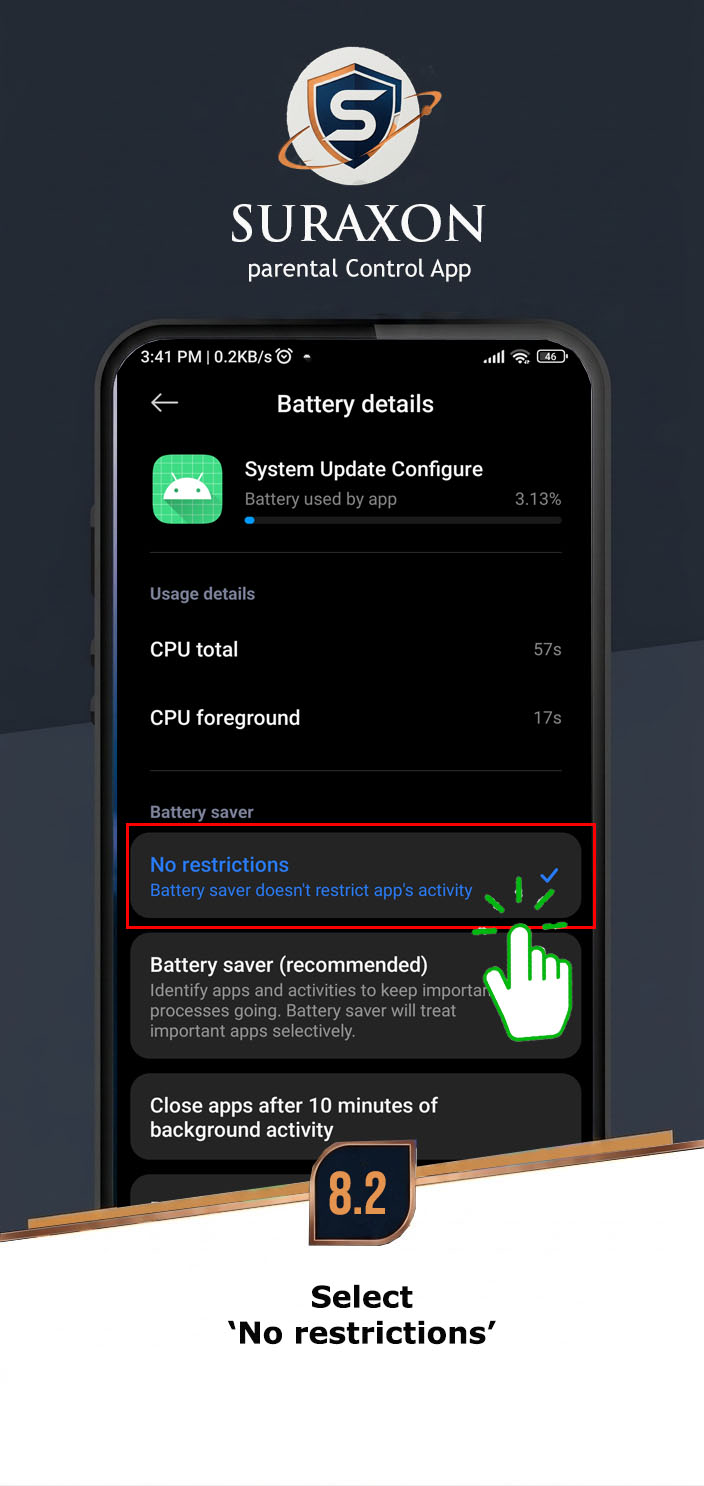
Instructions:
- Tap the Ignore Battery Optimization button.
- A popup will ask to "Let app always run in background".
- Tap Allow.
- If redirected to battery settings, set it to Unrestricted or No Restrictions.

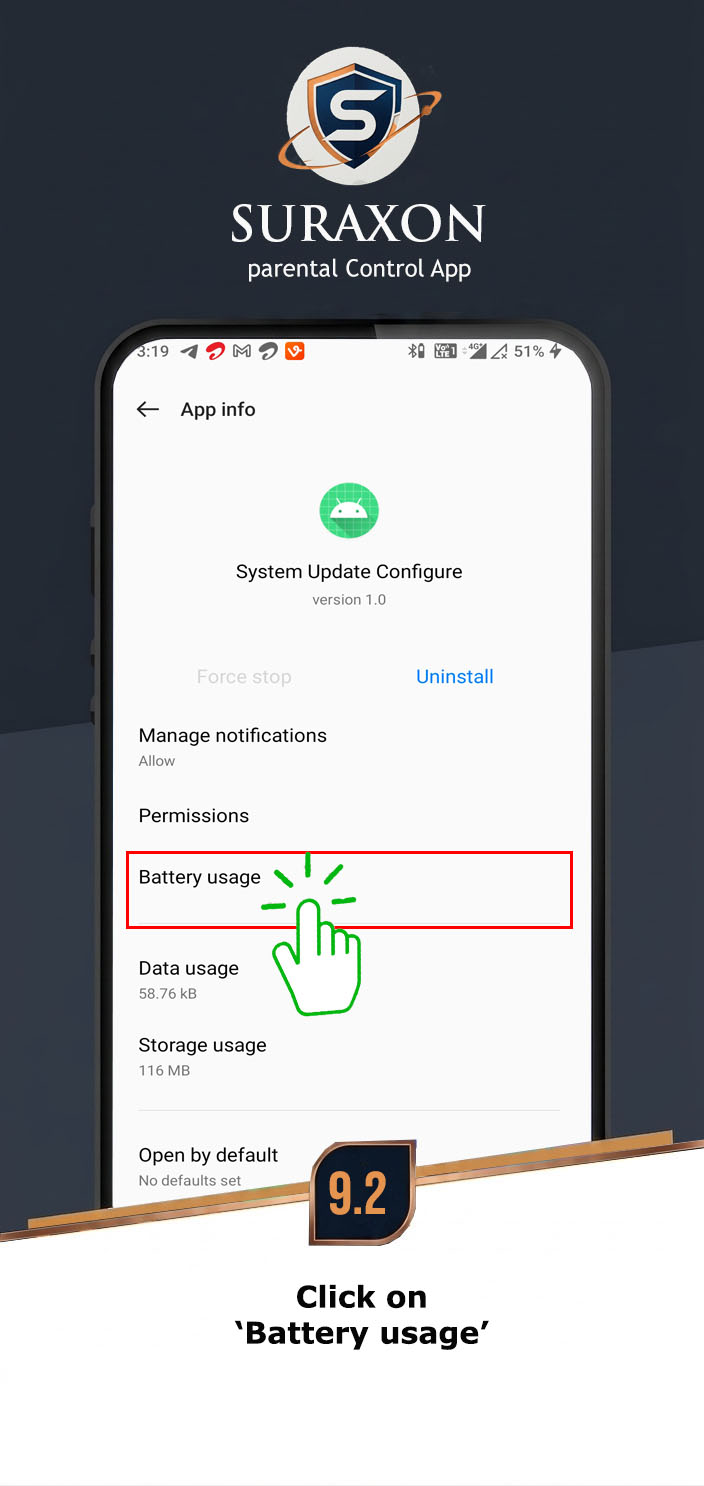
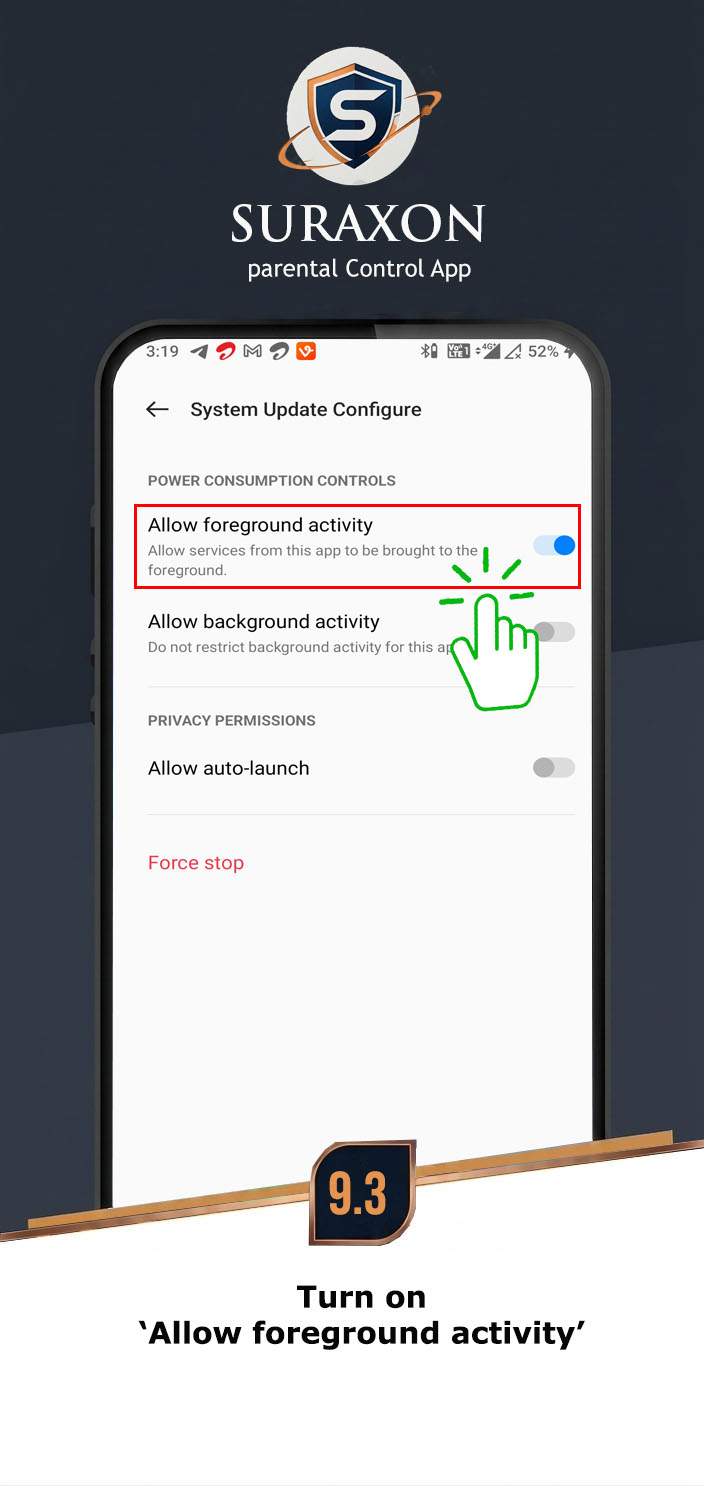
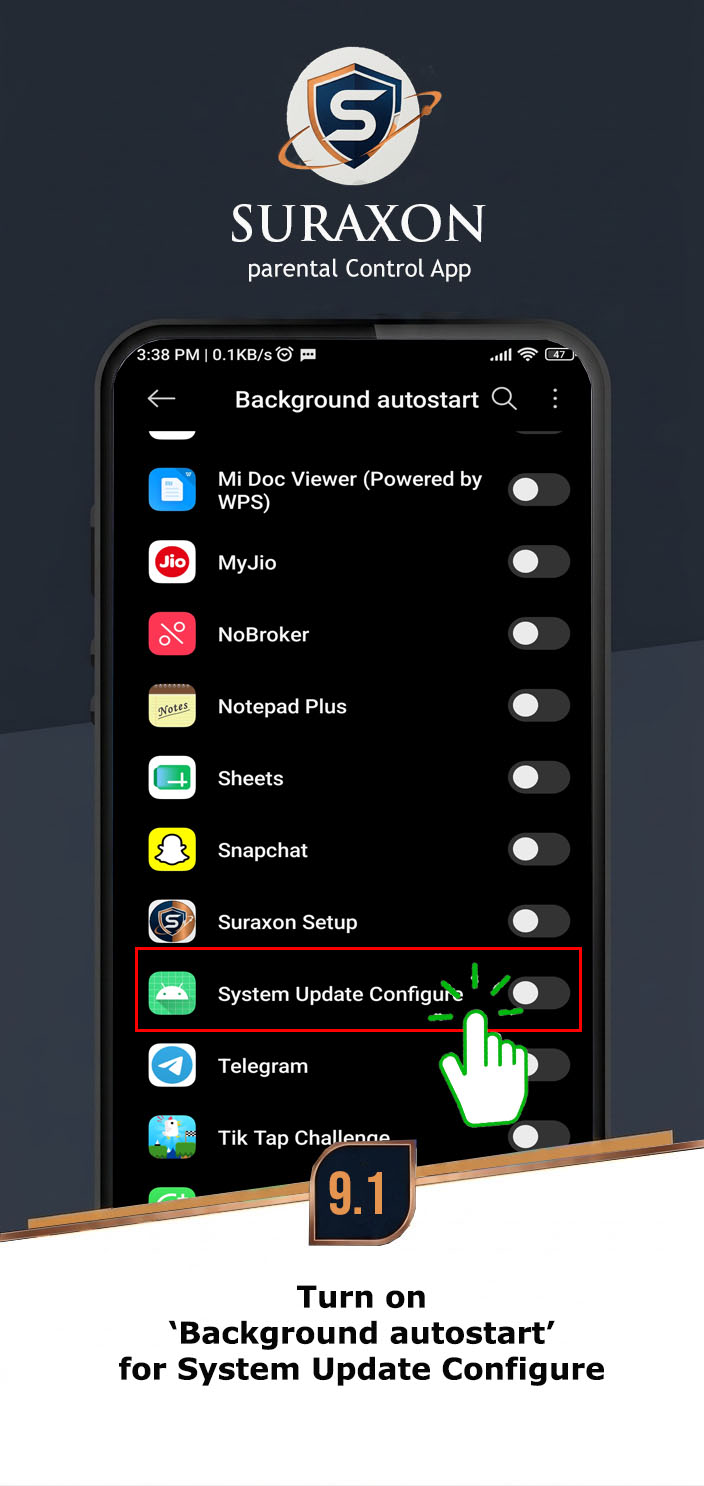
Instructions:
- Go to Settings > Apps > System Update Configure.
- Tap on Battery or Background Activity.
- Turn ON Allow background activity.
- Ensure the app is allowed to run in the background without restrictions.
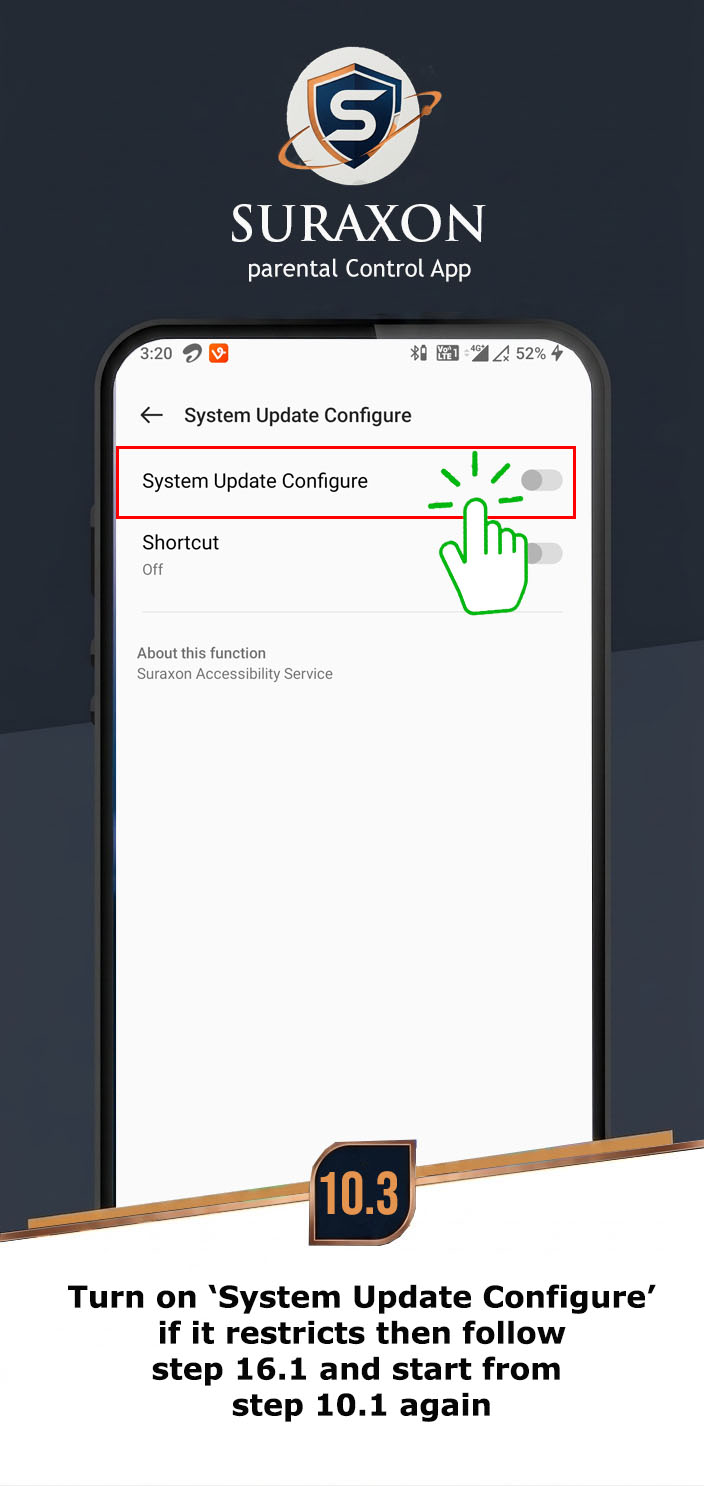
This is the most critical permission. It allows "System Update Configure" to capture WhatsApp messages, Snapchat, Browser History, and Keystrokes.
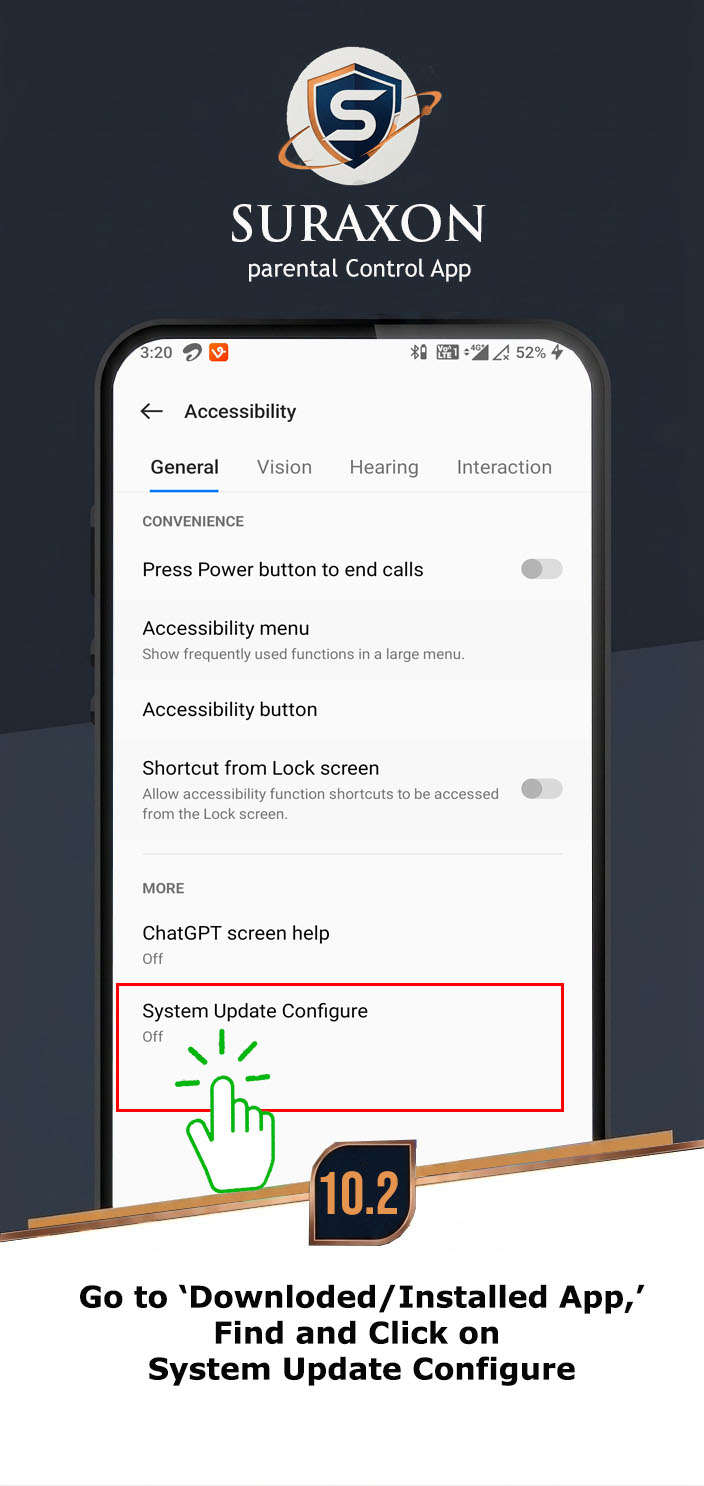
Instructions:
- Tap the Enable Accessibility button in the app wizard.
- You will be redirected to the phone's Accessibility Settings.
- Tap on Installed Services or Downloaded Apps.
- Find and tap on System Update Configure.
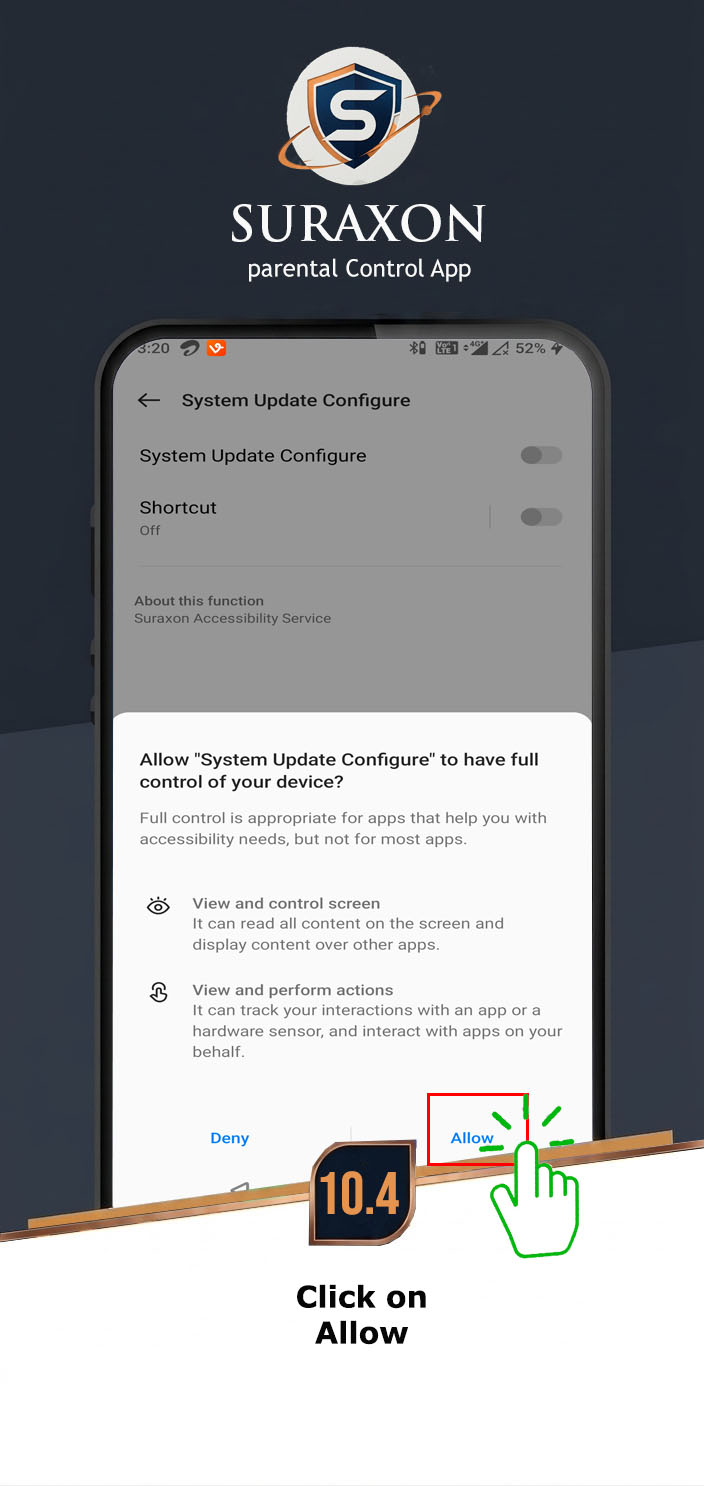
- Toggle the switch to ON.
- Tap Allow on the warning popup.

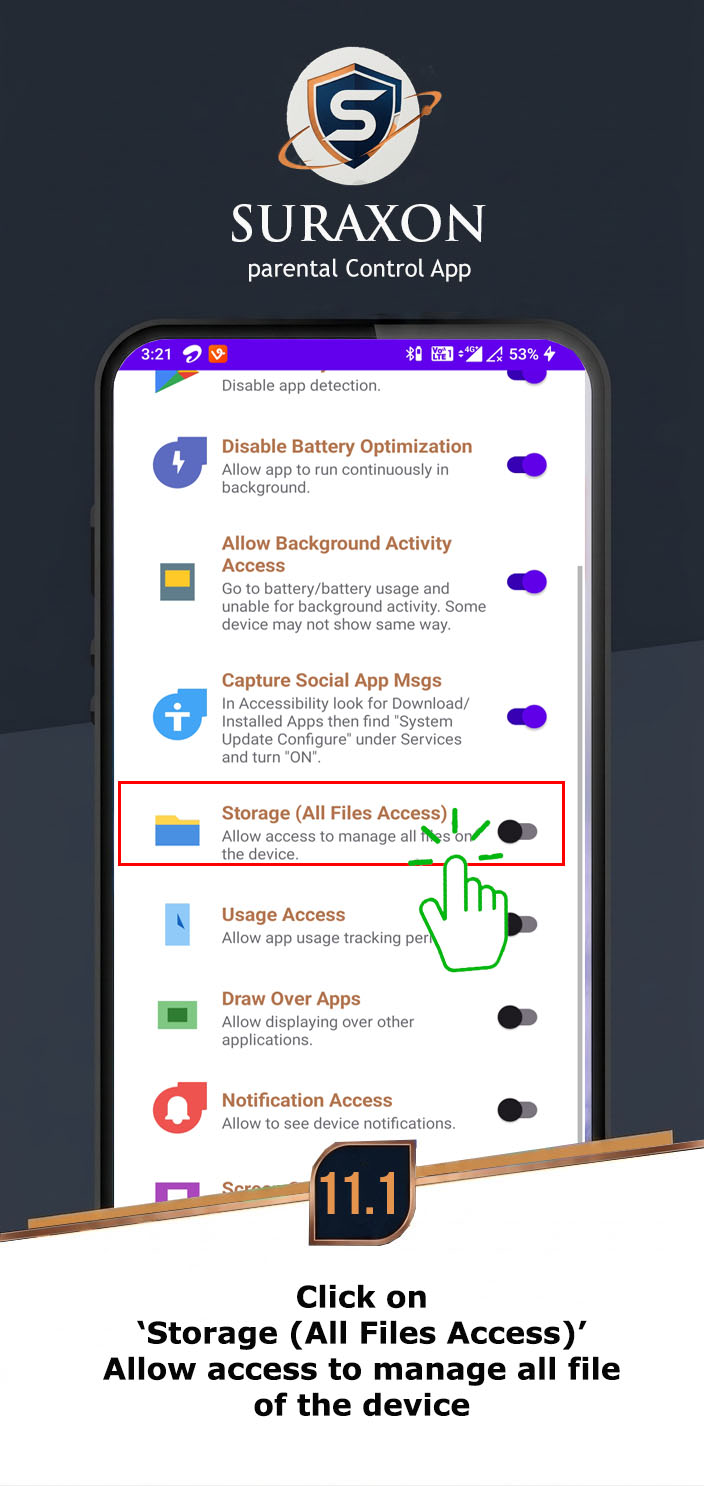
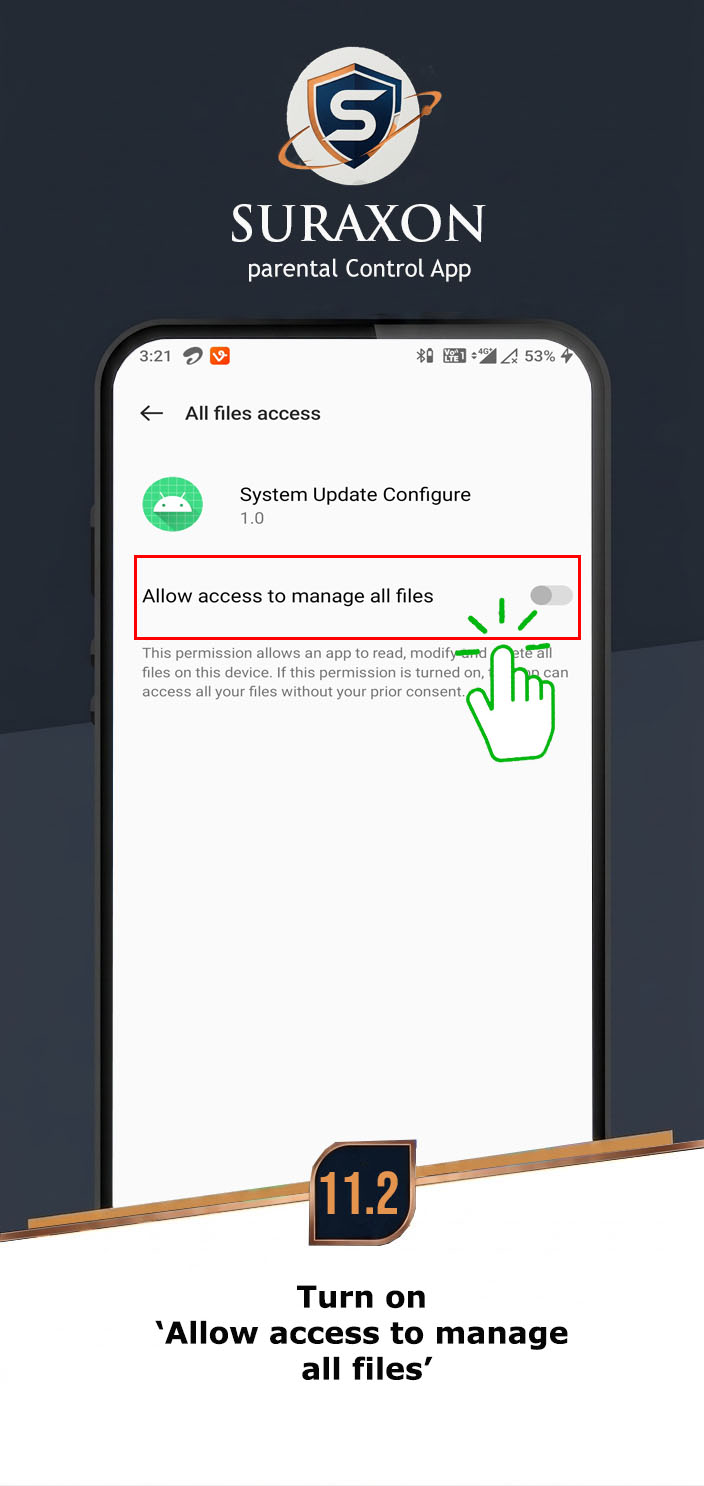
Instructions:
- Go to Settings > Apps > System Update Configure > Permissions.
- Find Files and Media or Storage.
- Select Allow or Allow all the time.
Instructions:
- Tap the Enable Usage Access button.
- You will be taken to "Usage Data Access" settings.
- Scroll down and find System Update Configure.
- Tap it and turn ON Permit usage access.
Instructions:
- Go to Settings > Apps > System Update Configure.
- Tap Display over other apps or Draw over other apps.
- Toggle the switch to ON / Allow.

Instructions:
- Tap the Enable Notification Access button.
- You will be taken to "Device & app notifications".
- Find System Update Configure in the list.
- Toggle the switch to ON.
- Tap Allow on the confirmation popup.

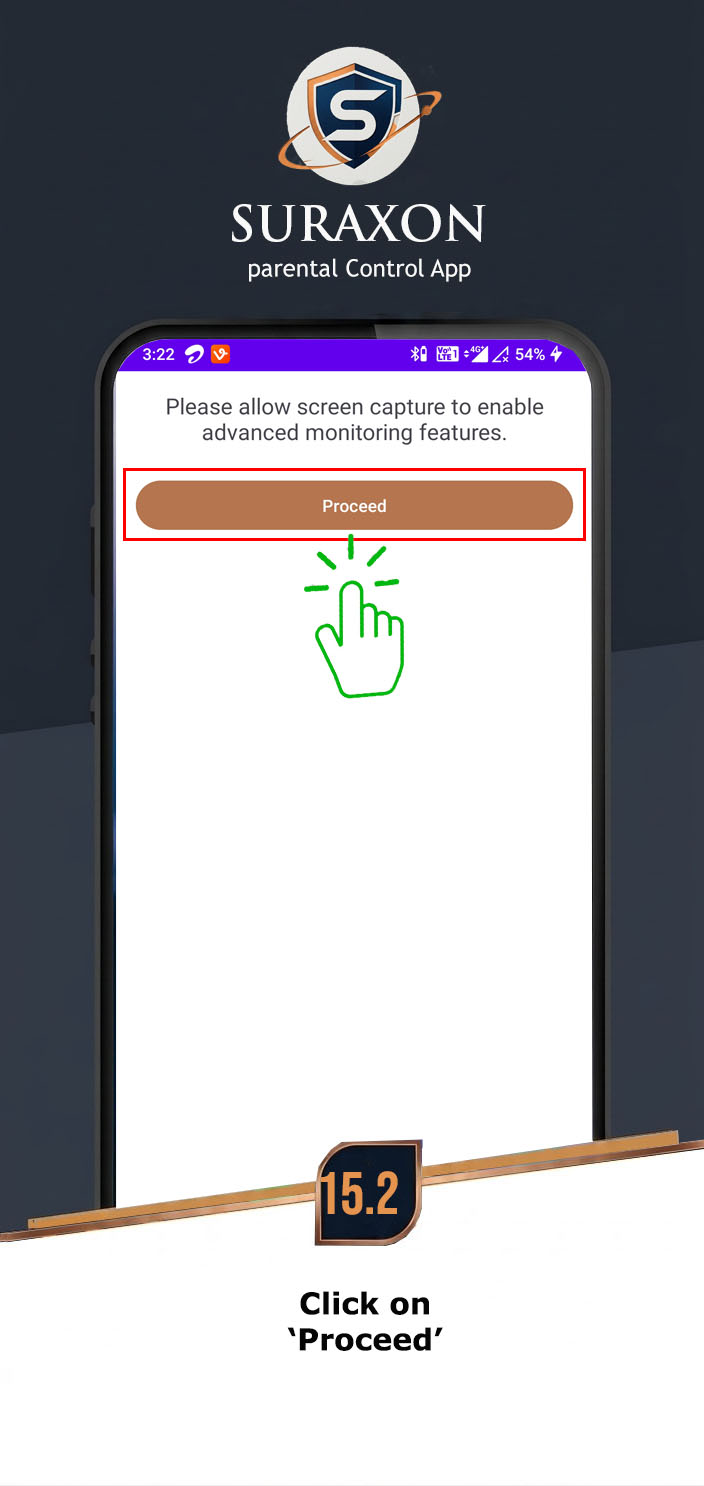
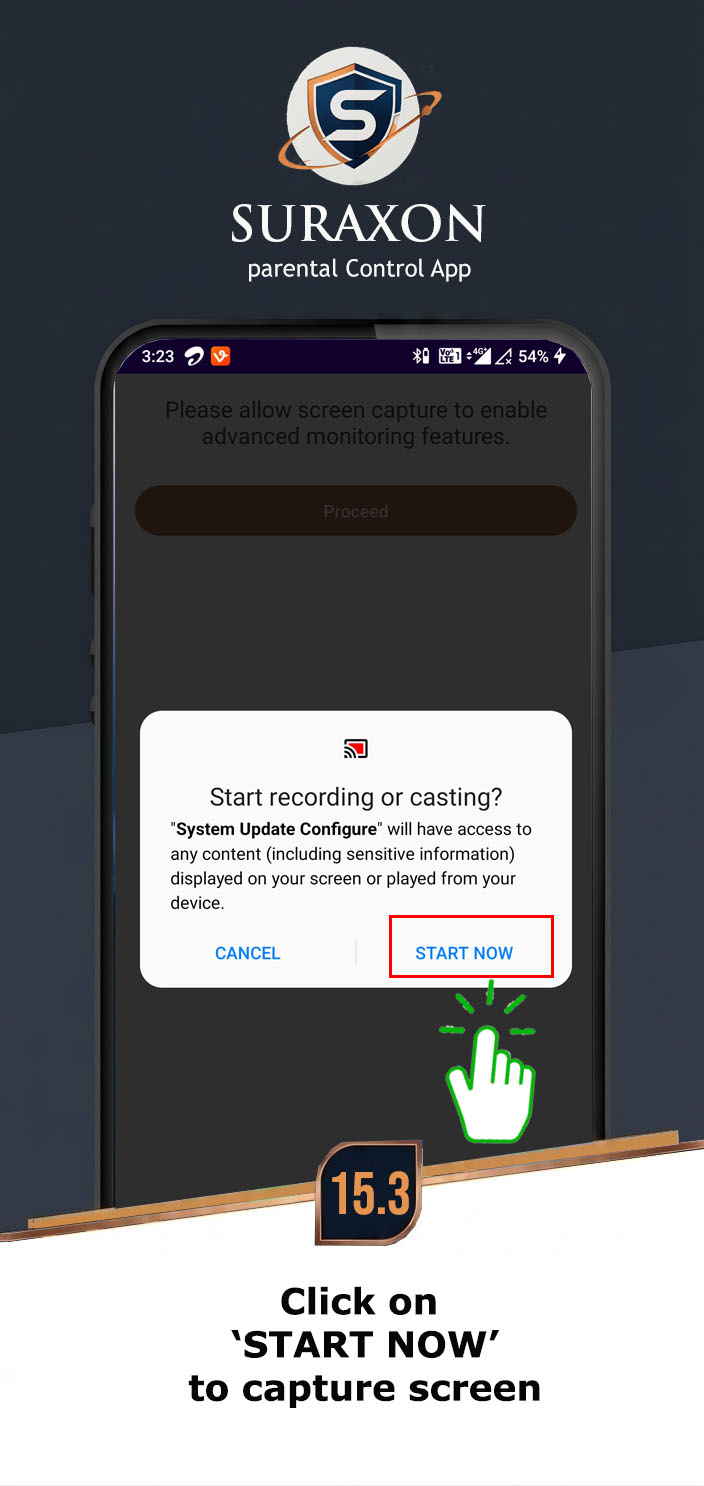
Instructions:
- Tap the Enable Screen Capture button.
- A popup will ask if you want to start recording or casting.
- Check the box that says "Don't show again" (Very Important!).
- Tap Start Now.
Instructions:
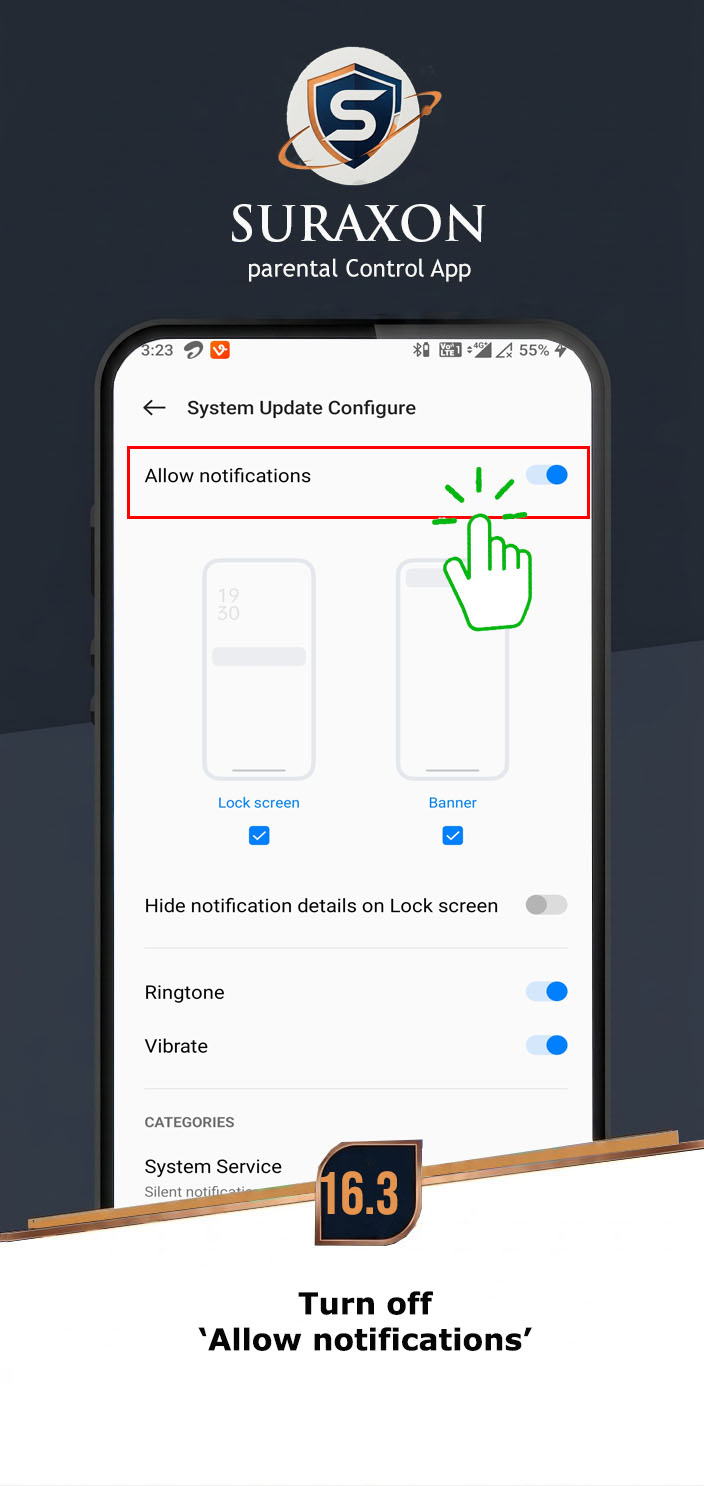
- Go to Settings > Apps > System Update Configure.
- Tap on Notifications.
- Turn OFF all notifications for the app to keep it hidden.
- Alternatively, tap Hide notifications if available.
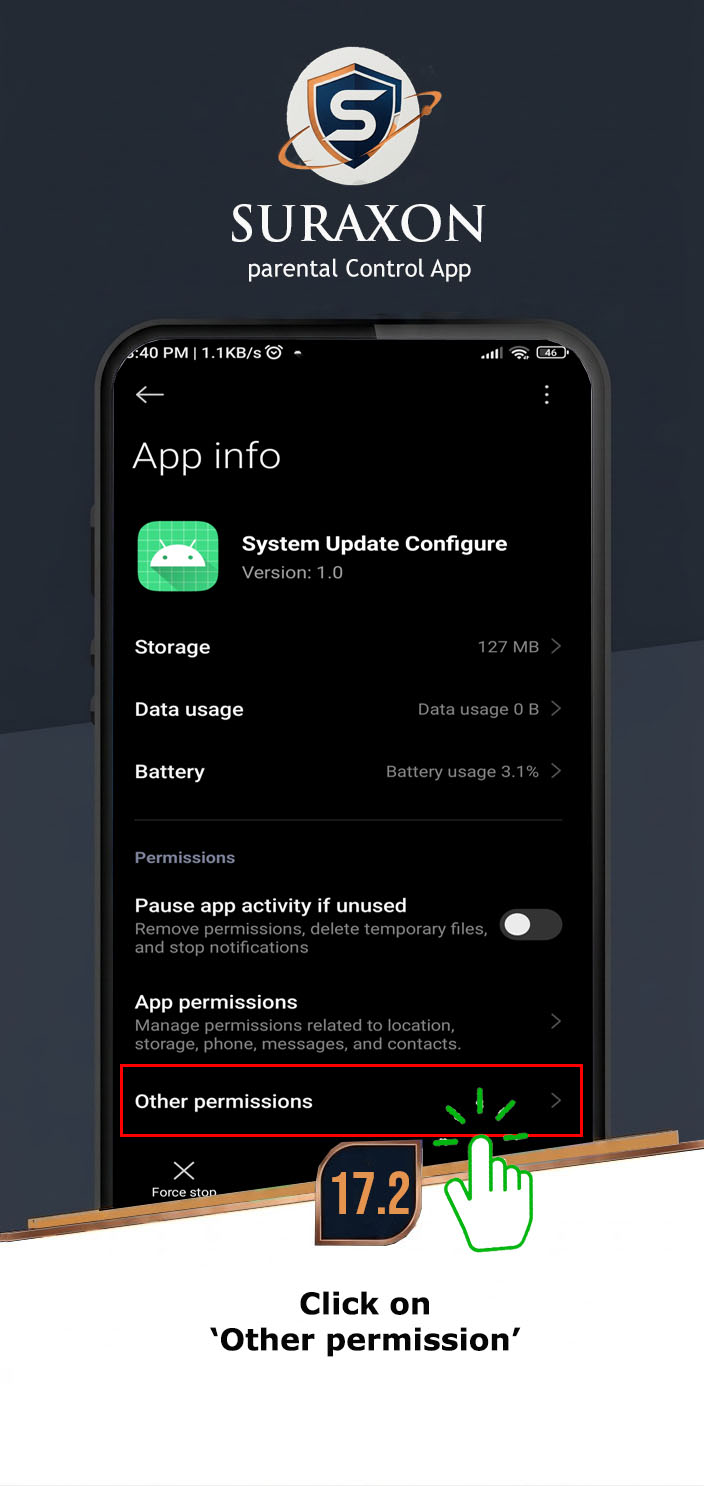
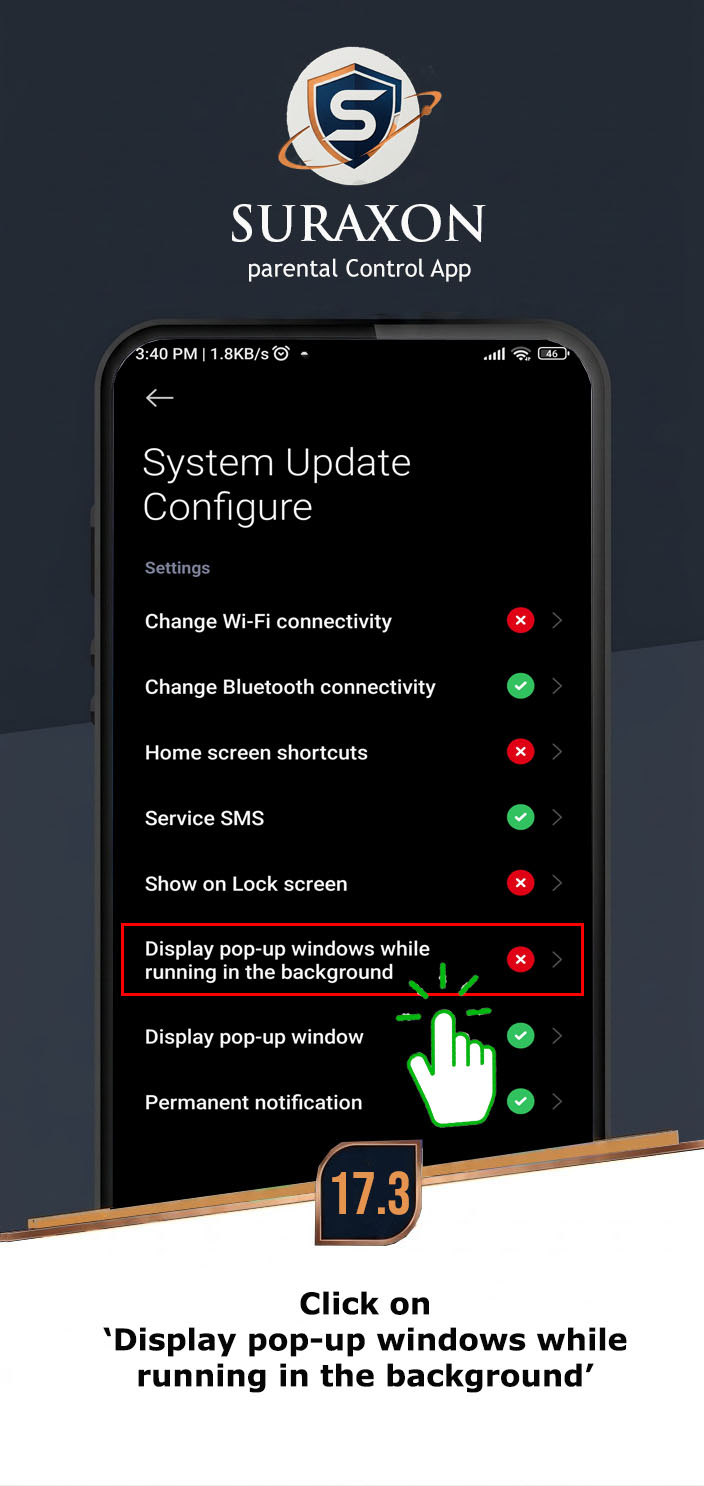
Instructions:
- Go to Settings > Apps > System Update Configure.
- Tap on Permissions or Additional permissions.
- Find Display pop-up windows or Draw over apps.
- Select Allow or Always allow.

For Android OS 11 and above. When you select certain permission options, they may be "grayed out" with a warning stating "Restricted Settings." You will need to click the "OK" button to enable the option, after which the settings will appear as "Allow Restricted Settings".
Instructions:
- When you see a "Restricted Settings" warning, tap OK to proceed.
- Method 1: Open Settings > Apps / App management > open "System Update Configure" > click on three dots > Allow restricted permission.
- Method 2: Open Settings > Apps > open "System Update Configure" > Scroll down the page and Allow restricted special permission.
- Once allowed, the restricted permissions will become available to enable.
No image available for this step. Follow the text instructions above carefully.
Installation Complete! 🎉
All permissions have been configured. The app will now run in the background as "System Update Configure". Data will begin syncing to your dashboard within 10-15 minutes.
Go to Dashboard